CARVIN
Easy10 - 15 min11 steps·Original on iFixit ↗

2004-2010 Volkswagen Touareg European Headlight Switch Replacement

Many places tell you about problems you'll have when installing the European Headlight switch with respect to the US Touareg complaining about the rear fog light not being there. Alternatives to prevent this are to install the rear fog light (about a 2 hour job according to some folks that have completed the installation) or bending pin 7 over on the headlight switch (thus preventing you from ever using it for rear fog light operation). I'm offering a solution between the two.

My goals:

  • Don't destroy the headlight switch - I may want to wire up the rear fog lights some day and I don't want to have to buy another $80 switch.
  • I don't feel like spending two hours installing the rear fog light right now
  • I'll eventually pull the headlight switch out too far and cause the rear fog light burnt out warnings - so lets prevent that

My solution...open up the headlight switch wiring harness and safely remove the connection inside the plug, tie the wire out of the way, and accomplish the same thing as bending pin 7 on the switch itself, but instead not rendering it useless for future rear fog installations (and increasing resale value of the switch should you ever sell it when you part ways with your Touareg).

The job requires:

  • Euro headlight switch
  • Wire cutter (used to snip a zip tie, not cut a wire!)
  • A new zip tie (small one)
  • Small flat blade screw driver
  • Some electrical tape
  • 5 minutes

Parts (3)

Step-by-step instructions

Step 1 · photo 1
1
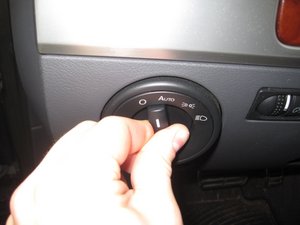
  • First, remove the existing headlight switch.
  • Turn the switch to the off position (note that this pic was taken with the new light switch already in place).
Step 2 · photo 1
2
  • Push the center of the switch in.
Step 3 · photo 1
3
  • While keeping it depressed, rotate the switch to the right. It will turn slightly.
Step 4 · photo 1Step 4 · photo 2
4
  • Now pull the switch out of the dash.
Step 5 · photo 1Step 5 · photo 2
5
  • Remove the connector from the switch by depressing the release tab and pulling the connector out.
Step 6 · photo 1
6
  • Cut the existing zip tie - the original one should be black.
  • Again, this pic was taken after the install was complete, so you're seeing the replacement white zip tie here.
Step 7 · photo 1Step 7 · photo 2
7
  • Remove the connector from the housing itself. Do this with a small flat blade screw driver.
  • Pry up the locking mechanism and push the connector out of its shell.
  • With the right size screw driver, you can do this in one motion.
  • See the pics showing the housing (already separated from the connector) with the screw driver in place showing the right way to pry the lock open and push out the connector.
Step 8 · photo 1
8
  • Now with the connector removed, locate socket 7.
  • Remove the socket by pressing the release tab on the socket (see picture) and pulling the wire out of the connector.
Step 9 · photo 1
9
  • Now fold the wire back up against the harness and use the electrical tape to hold it in place.
Step 10 · photo 1Step 10 · photo 2
10
  • Slide the connector back into the housing and replace the zip tie you cut earlier.
Step 11 · photo 1
11
  • Plug the harness into your new euro headlight switch and push it back into the dash.
  • Rotate the switch to the off position to allow the center to pop back out and engage the lock.

Conclusion

To reassemble your device, follow these instructions in reverse order.

Guide content belongs to iFixit, license CC BY-NC-SA. Open original

Замена переключателя фар Volkswagen Touareg в Европе 2004-2010 гг. — Carvin Garage · Carvin