CARVIN
Easy15 min6 steps·Original on iFixit ↗

2010-2017 Suzuki Swift Tail Light Bulb Replacement

This guide will demonstrate how to replace the main tail gate light bulb on the left side of the car. The process is similar for the right side, or an other tail light bulb.

  • P21/5W (main rear light/brake light)
  • PY21W (blinker light)
  • P21W (reversing light)

Tools (3)

Parts (1)

Step-by-step instructions

Step 1 · photo 1Step 1 · photo 2Step 1 · photo 3
1

loosen the tail light

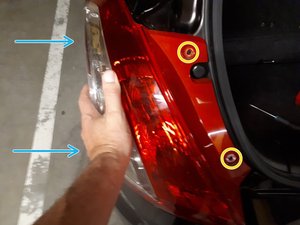
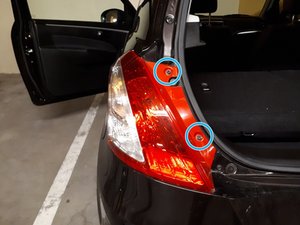
  • Unscrew the two visible bolts.
  • ''After unscrewing the bolts, the other side of the light is still fastened by two clickable plugs.''
  • Using the panel removal tool, pry behind each corner and unclick each plug.
Step 2 · photo 1
2

access backside of the light

  • Remove the light from the frame and place it in the trunk.
  • You might need to remove some of the cabling from cable guides.
  • You can also better see the plugs that held the light in place.
Step 3 · photo 1
3

remove the fitting

  • Unscrew the fitting about 45 degrees and lift it from the casing.
Step 4 · photo 1Step 4 · photo 2
4

replace the bulb

  • Remove the bulb by turning it about 45 degrees.
  • And do the reverse with the new bulb, push and turn.
  • ''The bulb has 2 guide pins assuring a correct install.''
  • ''The fitting has 2 corresponding receivers.''
Step 5 · photo 1
5

insert fitting

  • Insert the fitting by matching up the fitting guides with their openings on the casing and turn it 45 degrees clockwise.
Step 6 · photo 1
6

put the light back

  • Tuck back any cables you loosened, and place the light back on the car frame.
  • Make sure the replaced light actually works.
  • Push the light plugs back in.
  • Put the 2 screws back in.
  • You are done.

Guide content belongs to iFixit, license CC BY-NC-SA. Open original

Замена лампочки заднего фонаря Suzuki Swift 2010-2017 — Carvin Garage · Carvin