CARVIN
Difficult30 - 45 min24 steps·Original on iFixit ↗

Keurig K10 MINI PLUS Water Pump Replacement

The Water Pump within the Keurig K10 MINI Plus is a deeply embedded part. Due to the nature of it being attached both to an electrical source and a water source, it is not recommended to attempt this guide without previous familiarity with both.

Tools (4)

Step-by-step instructions

Step 1 · photo 1Step 1 · photo 2
1
  • Lift the cold water reserve lid up to reveal its hinge.
  • Using either the metal spudger or the opening tool, gently pry the plastic out of the metal axle.
Step 1 · photo 1Step 1 · photo 2
1
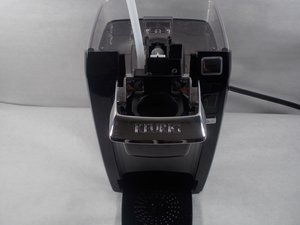
  • Remove two 9 mm Phillips #1 screws.
  • Avoid the top needle if at all possible. The needle may cut you and/or penetrate your skin.
  • The screws are located on the top of where the K-Cup would be.
Step 1 · photo 1Step 1 · photo 2Step 1 · photo 3
1
  • Remove two 14 mm Phillips #2 screws.
  • Remove two 12 mm Phillips #2 screws.
  • Lift the arm off the assembly. This will reveal the tank hole as shown.
  • It is recommended that you clog the tank hole with a napkin or something similar in order to prevent small parts from falling into the heating element.
Step 1 · photo 1Step 1 · photo 2
1
  • Pull the head assembly forward to reveal the two plastic axle points that keep the head assembly attached to the base.
  • There is a spring concealed by a white piece as shown.
Step 1 · photo 1Step 1 · photo 2Step 1 · photo 3
1
  • Remove two 14 mm Phillips #2 screws.
  • Remove two 12 mm Phillips #2 screws.
  • Screws circled in red may be hard to reach and will require a screw driver with a neck width of 5mm or less.
Step 1 · photo 1Step 1 · photo 2Step 1 · photo 3
1
  • Remove two 9.7 mm Phillips #2 screws.
Step 2 · photo 1
2
  • Repeat the last step on the other hinge, making sure to keep a firm grasp on the lid as it comes off to avoid dropping it.
Step 2 · photo 1Step 2 · photo 2Step 2 · photo 3
2
  • Once you remove the screws, the top cover should come out.
  • The back of the cover is held in place by two locking tabs. To remove the cover, pull it back slightly and it should come free.
  • You will then want to remove these screws which are the same size.
  • The needle is sharp, so be careful.
Step 2 · photo 1Step 2 · photo 2
2
  • Remove two 9.7 mm Phillips #2 screws.
  • Remove two 11.5 mm Phillips #2 screws.
  • Remove the cold water reserve arm's plug from the arm itself in order to allow access to the base screws.
Step 2 · photo 1Step 2 · photo 2
2
  • Using the iFixit Opening Tool, gently pry apart the plastic head assembly piece from both the body's axles and its left to remove it.
Step 2 · photo 1Step 2 · photo 2Step 2 · photo 3
2
  • Detach the seat by giving it a firm tug up.
Step 2 · photo 1Step 2 · photo 2Step 2 · photo 3
2
  • Pry open the left, right, and back of the back plate by pulling out and up.
  • Do not be afraid to be fairly forceful when removing the back plate—it is snapped together fairly tight.
Step 3 · photo 1
3
  • Once you get those removed, you are going to want to pull on the hose until it pops off.
  • Once the hose comes off, the needle will fall out by itself.
  • Be careful when picking up the needle as the needle is sharp.
Step 3 · photo 1Step 3 · photo 2
3
  • Remove two 18 mm Phillips #2 screws.
  • Finally, detach the arm from the cold water reserve basin.
Step 3 · photo 1Step 3 · photo 2
3
  • Flip over the device.
  • Remove four 11.5 mm Phillips #2 screws.
Step 3 · photo 1Step 3 · photo 2
3
  • Rotate the device to reveal the pump side.
  • Remove one 9.7 mm Phillips #2 screw.
Step 4 · photo 1Step 4 · photo 2
4
  • Reposition the metal lid while keeping the heat sink attached in order to reach the screws underneath.
  • It is recommended that you leave the heat sink aside as it contains thermal paste.
Step 4 · photo 1Step 4 · photo 2
4
  • Remove the power connectors attached to the water pump.
  • Remove the water hose attached to the water pump.
  • Remove the water pump itself.
Step 5 · photo 1Step 5 · photo 2
5
  • Remove two 11.5 mm Phillips #2 screws.
  • Be careful not to confuse these two screws for the ones behind them.
Step 6 · photo 1Step 6 · photo 2
6
  • Turn the device right side up again.
Step 7 · photo 1Step 7 · photo 2Step 7 · photo 3
7
  • Begin to pry open the front plate using the iFixit Opening Tool as shown.
  • Pry upwards in order to take the cover off.
Step 8 · photo 1Step 8 · photo 2
8
  • Remove the front plate.
  • Be careful of the wires here.
Step 9 · photo 1Step 9 · photo 2
9
  • Remove one 9.7 mm Phillips #2 screws.
Step 10 · photo 1Step 10 · photo 2Step 10 · photo 3
10
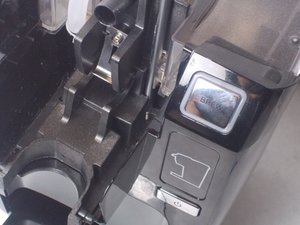
  • Remove the button housing to access the buttons.
  • The brew buttons can be easily popped out of place by pushing inwards from the front of the unit.

Conclusion

To reassemble your device, follow these instructions in reverse order.

Guide content belongs to iFixit, license CC BY-NC-SA. Open original

Замена водяного насоса Keurig K10 MINI PLUS — Carvin Garage · Carvin