CARVIN
Moderate45 min8 steps·Original on iFixit ↗

Kia Rio Inner Car Door Handle Replacement

This project will require taking off some bolts or screws that may be difficult to loosen. Although not required, an impact driver or impact wrench may be suggested. This is quite easy to follow but the individual steps may be difficult. If your car is older or live in a rainy place then the project may be difficult.

Tools (4)

Step-by-step instructions

Step 1 · photo 1Step 1 · photo 2
1
  • Find all the caps hiding the screws and remove them.
  • These are typically found in the door handle, the side of the door near the top, and in the middle of the door panel.
Step 2 · photo 1Step 2 · photo 2Step 2 · photo 3
2
  • Remove all screws holding the door panel in place.
  • These are typically found in the middle of the door panel, on the side of the door and on the bottom right side of the door panel.
Step 3 · photo 1Step 3 · photo 2
3
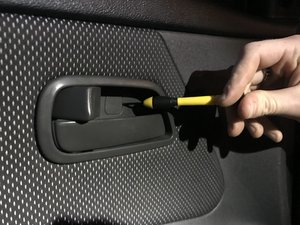
  • Remove the screw on the door handle.
  • Remove the handle's cover.
Step 4 · photo 1
4
  • Remove the screw holding the door handle to the door frame.
Step 5 · photo 1Step 5 · photo 2Step 5 · photo 3
5
  • Remove window crank handle using the handle removal tool using the orientations seen in the first and second pictures.
  • The handle removal tool works by removing the clip seen in the third picture.
Step 6 · photo 1Step 6 · photo 2
6
  • Remove the door panel by pushing upwards.
  • Although not very difficult to take off, use proper squatting form to ensure you don't hurt yourself.
Step 7 · photo 1Step 7 · photo 2
7
  • Use a sharp knife to cut the strip calk connecting the top half of the moisture shield.
  • Pull the moisture shield half way down.
  • Don't tear the moisture shield cover.
  • The strip calk will still work as an adhesive once taken off so you can stick the moisture shield back onto the door frame.
Step 8 · photo 1Step 8 · photo 2
8
  • Remove the door handle from the door frame.
  • Remove the wires from the door handle.
  • Put on your replacement door handle.

Conclusion

To reassemble your device, follow these instructions in reverse order.

Guide content belongs to iFixit, license CC BY-NC-SA. Open original