CARVIN
Moderate30 min7 steps·Original on iFixit ↗

2006 Mitsubishi Eclipse Tail Light Replacement

When the outer plastic lens of the entire bulb housing is cracked, the light bulbs are at risk of no longer being completely protected. For this reason, the entire housing part must be replaced. Use this guide to replace the cracked or damaged tail light with a new, completely functional tail light.

Tools (6)

Step-by-step instructions

Step 1 · photo 1
1
  • Turn off the vehicle and disconnect the battery. To do this, disconnect the '''red''' positive lead of the battery using a 10 mm wrench.
  • Disconnecting the battery of the car is important to avoid possible electrocution.
Step 2 · photo 1
2
  • Open the trunk hatch using the button on the underside of the hatch lip. The car must first be completely unlocked to open the hatch.
Step 3 · photo 1Step 3 · photo 2
3
  • Remove all of the 17 x 10 mm black plastic '''retainer clips''' in the outer rim cover where the hatch would usually be seated.
  • Using a''' Phillips #2 screwdriver''', push into their holes to release the locking mechanism. Then, using a '''fastener removal tool''', pry them out.
Step 4 · photo 1Step 4 · photo 2
4
  • Remove the cover underneath the '''retainer clips.'''
  • Remove the '''10 mm bolt''' on the leftmost or rightmost side (depending on which side you are working) using a '''10 mm socket wrench'''
Step 5 · photo 1Step 5 · photo 2Step 5 · photo 3
5
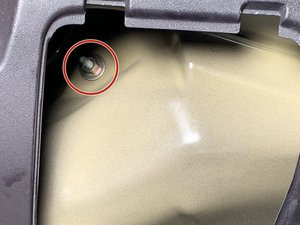
  • Use a '''Flathead Screwdriver or fastener removal tool''' to remove the smaller cover inside of the trunk near where the side of the housing will be.
  • Once the cover is removed, the outer housing of the tail light will be revealed. Remove the left-most '''10 mm nut '''on the outer housing using a '''10 mm socket wrench'''.
Step 6 · photo 1Step 6 · photo 2
6
  • Be gentle while removing the tail light to prevent denting the body. You may use a towel with the screwdriver if you would like to. You should also have a good grip on the tail light to prevent it from dropping.
  • Using a '''Flathead screwdriver''' or prying tool, remove the cracked bulb housing. On the backside of the housing, there will be 4 separate wire attachments:
  • a grouping of green and black wires attached to a gray plastic head
  • a grouping of green and black wires attached to a black rubber head
  • a grouping of red and black wires attached to a gray plastic head
  • a grouping black and yellow wires attached to a black plastic head
Step 7 · photo 1Step 7 · photo 2Step 7 · photo 3
7
  • Disconnect the bulb assembly wires. Twist out the 3 plastic heads counter-clockwise and pull out the black rubber head. On the inside of the rubber head, there is a clip attachment for those set of wires. Remove the clipped wires.

Conclusion

To reassemble your device, follow these instructions in reverse order.

Guide content belongs to iFixit, license CC BY-NC-SA. Open original