CARVIN
Moderate10 min14 steps·Original on iFixit ↗

2009 Nissan Armada Serpentine Belt Replacement

The serpentine belt is imperative to replace if it is torn or stripped, because it helps power the car’s engine and steering system. Thus, the car will stop running if the serpentine belt fails. No special requirements are necessary for replacing a serpentine belt. As for hazards, one must be sure the car is turned off before beginning our step-by-step guide for replacing the serpentine belt.

Tools (5)

Parts (1)

  • 2003-2007 Honda Accord Serpentine Belt buy ↗

Step-by-step instructions

Step 1 · photo 1Step 1 · photo 2Step 1 · photo 3
1
  • Open the hood latch on the underside of the dashboard on the left side of the drive side.
Step 2 · photo 1
2
  • Once the hood is cracked, open it the rest of the way with the hood latch switch located in the middle of the hood.
Step 3 · photo 1Step 3 · photo 2
3
  • Now that the hood is open, remove the plastic shield that covers the engine by loosening the two 10mm bolts.
Step 4 · photo 1Step 4 · photo 2
4
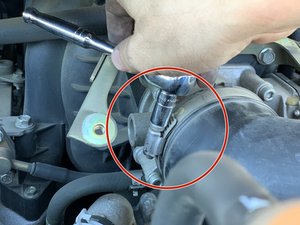
  • Loosen the hose clamps with an 8mm socket that hold the air intake to the throttle body and to the airbox.
Step 5 · photo 1
5
  • Touch your hand to the proper belt tensioner pulley, which is the second pulley from the left.
Step 6 · photo 1
6
  • Attach your breaker bar to the tensioner pulley, and pull towards the left to remove tension.
Step 7 · photo 1Step 7 · photo 2
7
  • Insert the pin into the slot provided so that you do not have to keep holding the breaker bar. (This step is not necessary but is a highly advised option).
Step 8 · photo 1Step 8 · photo 2Step 8 · photo 3
8
  • Remove the belt from the pulleys and discard.
Step 9 · photo 1
9
  • Find the proper belt routing inside your owner’s manual. It is also found on the back of the new belt box.
Step 10 · photo 1Step 10 · photo 2
10
  • Install the new belt by properly routing it across the pulleys following the proper belt routing. (See step 9 for proper routing).
Step 11 · photo 1
11
  • Attach the breaker bar to the tensioner pulley again, and remove the pin making sure the belt stays in place.
Step 12 · photo 1Step 12 · photo 2Step 12 · photo 3
12
  • Return to steps 4 and 3 and complete these steps in reverse order.
Step 13 · photo 1
13
  • Start the engine, and make sure that the belt is not squeaking or making any unfamiliar noises.
Step 14 · photo 1
14
  • Close the hood, and you are ready to head down the road!

Conclusion

To reassemble your device, follow these instructions in reverse order.

Guide content belongs to iFixit, license CC BY-NC-SA. Open original