CARVIN
Easy20 min16 steps·Original on iFixit ↗

1998 Nissan Frontier Fuel Filter Replacement

This repair is an easy repair for a beginner that is wanting to work on their own vehicle. However, there are a few things to be cautious of before making this repair. Make sure your fuel lines are not dry rotted leading to a crack and beginning to leak fuel when working on the fuel filter. If so make sure you buy the adequate parts before beginning so you do not have to have to repeat the repair to get the vehicle running properly.

Tools (6)

Parts (1)

Step-by-step instructions

Step 1 · photo 1Step 1 · photo 2
1
  • Before getting under the vehicle to begin replacement. Apply the emergency hand brake to prevent the vehicle from rolling.
Step 2 · photo 1Step 2 · photo 2
2
  • Locate the fuel filter under the passenger side of the cabin, mounted on the inside frame rail.
Step 3 · photo 1
3
  • Place a drain pan underneath the fuel filter to collect any excess fuel that leaks from the fuel filter and lines during disassembly.
Step 4 · photo 1
4
  • Using the 10 mm socket wrench, loosen the bolt on the clamp that holds the fuel filter in place.
Step 5 · photo 1
5
  • Using vice grips, apply them to the fuel lines on both sides of the fuel filter before removing the hoses. This will prevent any excess fuel from leaking out of the lines.
  • Remember to leave about 4 inches of room to slide the hose clamps off the fuel filter fitting.
Step 6 · photo 1
6
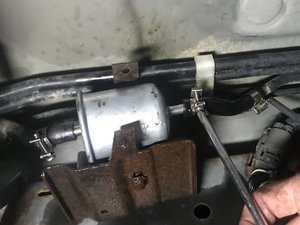
  • Using a Phillips 3 screwdriver, loosen the screws on the hose clamps located on both sides of the fuel filter.
Step 7 · photo 1
7
  • Slide the fuel line clamps off both sides of the fuel filter fittings.
Step 8 · photo 1Step 8 · photo 2
8
  • Using a flat head screw driver, work loose the fuel line if it has been on the fitting for many years. Using your hands or a pair of pliers gently rotate and pull on the line to remove the fuel line completely from the fitting.
Step 9 · photo 1
9
  • Remove the old fuel filter from the clamp in which it should slide out since it is already loose.
Step 10 · photo 1
10
  • Put the fuel line on the filter that is closest to the front of the vehicle first.
  • This will allow you to have more space while installing the other hose onto the other end of the fuel filter. Installing the hoses onto the fittings can be a bit tedious so you may have to apply some pressure to fully have the fuel line back on.
Step 11 · photo 1
11
  • Put the fuel filter back in the clamp.
Step 12 · photo 1
12
  • Place the other fuel line on the fuel filter fitting.
Step 13 · photo 1
13
  • Remove the vice clamps.
Step 14 · photo 1
14
  • Slide the hose clamps back on the fuel filter fittings over the fuel lines on both sides of the fuel filters.
Step 15 · photo 1
15
  • Using the Phillips 3 screwdriver, tighten the hose clamps on the fuel line until it is tight without over tightening cutting the fuel line.
Step 16 · photo 1
16
  • Using the 10 mm socket wrench, tighten the clamp that holds the fuel filter into place.

Conclusion

This is a good entry level fix to get your feet wet with working on vehicles.

Guide content belongs to iFixit, license CC BY-NC-SA. Open original