CARVIN
Moderate20 min13 steps·Original on iFixit ↗

2012-2016 Honda CR-V Oil and Oil Filter Replacement

This guide shows how to change the oil and oil filter for Honda CR-V 2012-2016 models.

Keeping the engine healthy is critical in getting good life out of your vehicle. Part of maintaining engine health is replacing the oil and oil filter on a regular basis. Honda CR-V 2012-2016 models need to have their engine oil and oil filters replaced every 7,500 miles or 12 months. If your car has high mileage then it’s suggested to replace the oil with a high mileage full synthetic. Most parts and tools listed can be found at a local auto supply store or purchased from an auto supply store online.

Tools (4)

Parts (4)

Step-by-step instructions

Step 1 · photo 1Step 1 · photo 2
1
  • Open the hood by pulling the hood latch.
  • Oil may be hot if the engine has not cooled.
  • Keep vehicle in park and off unless otherwise noted.
  • Chock both back wheels with blocks of wood to prevent car from rolling.
Step 2 · photo 1Step 2 · photo 2
2
  • Let the vehicle cool for 15 minutes if needed. Clean the area around the oil cap. Remove the oil cap.
Step 3 · photo 1Step 3 · photo 2Step 3 · photo 3
3
  • Locate the dipstick and check oil level.
Step 4 · photo 1
4
  • Place the drain pain under the chassis and align with the drain bolt.
Step 5 · photo 1
5
  • Locate the drain bolt.
Step 6 · photo 1Step 6 · photo 2Step 6 · photo 3
6
  • Remove the drain bolt with a 17mm socket wrench, and completely drain the oil.
Step 7 · photo 1
7
  • Remove the oil filter with a 45mm oil filter socket.
Step 8 · photo 1Step 8 · photo 2Step 8 · photo 3
8
  • Replace the drain bolt with a new drain bolt gasket (crush washer); Honda Washer, Drain Plug (14MM) 94109-14000. Use the 17mm socket wrench to tighten.
Step 9 · photo 1Step 9 · photo 2
9
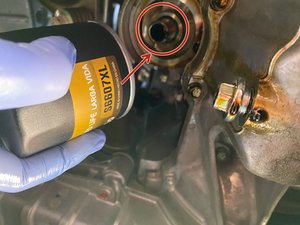
  • Install the new filter in place of the old filter. Hand tighten instead of using the oil filter wrench.
Step 10 · photo 1Step 10 · photo 2
10
  • Place the medium funnel and add new 0W-20 full synthetic engine oil. Add 4.2 quarts of oil.
Step 11 · photo 1
11
  • Replace the oil cap.
Step 12 · photo 1
12
  • Start the vehicle, and check for any leaks around the oil filter and oil drain plug.
  • Stop the vehicle and let the engine rest for 5 minutes.
Step 13 · photo 1Step 13 · photo 2Step 13 · photo 3
13
  • Use the dip stick to double check oil level and add more if needed.
  • Make sure the oil level is in between the low and high marks on the dip stick. Replace the dip stick and close the hood.
  • Reset the oil life in the maintenance section of the vehicle computer.

Conclusion

To reassemble your device, follow these instructions in reverse order.

Guide content belongs to iFixit, license CC BY-NC-SA. Open original