CARVIN
Easy10 - 15 min8 steps·Original on iFixit ↗

2017 Honda Accord Cabin Air Filter Replacement

This guide will display the process of removing and replacing the cabin air filter in the 2017 Honda Accord. The cabin filter needed for the replacement is the model CF10134.

Cabin air filter replacements are vital to maintaining the health of the air ventilation system in vehicles as the filter keeps bacteria, pollutants and dirt away ensuring clean air flow.

Before starting this guide, inspect your new filter to ensure there is no damage or markings of previous use.

Parts (1)

Step-by-step instructions

Step 1 · photo 1Step 1 · photo 2Step 1 · photo 3
1
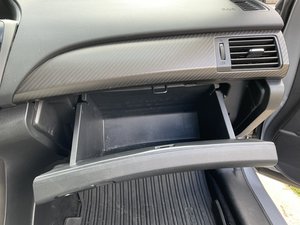
  • Push the lever connected to the right side of the glove box.
  • Remove items in the glove box as they can be unsafe moving forward.
Step 2 · photo 1Step 2 · photo 2Step 2 · photo 3
2
  • Push inwards on both sides of the glove box to release it.
  • Ensure the glove box does not hang from the hinges.
Step 3 · photo 1Step 3 · photo 2Step 3 · photo 3
3
  • Push the left and right hinges to release the cabin filter cover.
Step 4 · photo 1Step 4 · photo 2Step 4 · photo 3
4
  • Carefully remove the cover and pull the old cabin filter from the holder.
  • Note the direction of the air flow (downwards).
Step 5 · photo 1Step 5 · photo 2
5
  • Insert the new cabin filter with the direction indicated from the previous filter (downwards).
Step 6 · photo 1Step 6 · photo 2Step 6 · photo 3
6
  • Place the filter cover and ensure both hinges click into the holder.
Step 7 · photo 1Step 7 · photo 2Step 7 · photo 3
7
  • Insert the glovebox back into the dashboard and lock the tabs into place.
Step 8 · photo 1Step 8 · photo 2Step 8 · photo 3
8
  • Pull the lever back onto the glove box hinge.

Conclusion

To reassemble your device, follow these instructions in reverse order.

Guide content belongs to iFixit, license CC BY-NC-SA. Open original