I used home-made wooden car-ramps, but you can use a jack and jack-stands, or store-bought ramps
2
Gather your tools
The tools I used were:
14mm wrench for drain bolt
Toyota filter housing wrench
1/2in rachet to drive the filter housing wrench
⚠️Drain pan and clean/dirty rags
Pick or small screwdriver to pull off the old O-ring
✓Philips 3 screwdriver to remove filter housing access panel, can also use 10mm socket
💡Big-mouth funnel
3
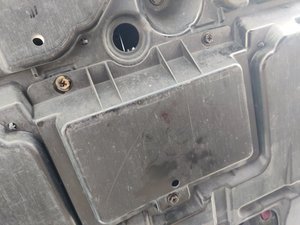
Remove oil filter housing access panel
Remove the filter housing access panel with the screwdriver or 10mm socket
There are 3 screws
4
Drain the oil
Position your drain pan under the oil pan - it's right-side of engine
Remove the oil pan drain bolt and try to avoid the mess!
5
Re-install the drain bolt
Once the oil is drained, wipe around the drain hole with your rags
Re-install the drain bolt with your 14mm wrench or socket - don't over-tighten it!
You're supposed to replace the washer on the bolt every time, but sometimes you forget to buy new ones
6
Remove the oil filter housing
Reposition your drain pan under the oil filter housing
Loosen the filter housing with your filter-housing-tool, or possibly with large channel-lock pliers...
While loosening it will start to drip - reposition your drain pan as required
Remove the filter housing completely
7
Install new filter and clean filter housing
Remove the old filter from the housing
Clean out the housing as required
It's usually at this point I switch to the next cleaner level of rag
Remove the housing o-ring with a small screwdriver or pick - there is actually a cut-out in the lip to allow easy access - Thanks Toyota
Wipe some oil on your new O-ring and ensure it's in the correct groove in the housing
8
Re-install filter housing and cover
After preparing the filter housing with new filter and o-ring, screw it back into the opening
It does not need to be super-tight, it seals with the o-ring, just snug it up
Re-install the cover using your 3 screws from before, I recommend only using a screwdriver, since you want to barely torque these - they go into plastic
9
Re-fill the engine with oil
Now it's time to go up-top and re-fill the engine with Oil
I used Penrite HPR 5
My 2008 Lexus IS350 took around 6.6L of oil to fill
After I put in around 6L I took it down off the ramps to level the car before taking the final readings on the dipstick
The dipstick is on the right-side of the engine on IS350
The dipstick will only read correctly when the car is on level ground
Now you get to clean up the mess with your remaining rags or kitty litter or whatever.
Usually I start up the engine and run it for around 5 seconds (while listening intently) then check under for leaks
10
Final tool detail
Maybe you have questions about the filter housing tool?
It's a Moker, I got it from Amazon [link|https://www.amazon.com/Moker-Compatible-2-0-5-7-Highlander-Accessorie/dp/B083SRNWJB/]
I'm in New Zealand, so the car is a JDM import from Japan, and I'm using locally-purchased Australian Penrite HPR 5 oil, and a Japanese JS Asakashi OE116J filter bought online from Singapore
Conclusion
After starting the car check underneath for any leaks.
Guide content belongs to iFixit, license CC BY-NC-SA. Open original
Замена масла и масляного фильтра Lexus IS — Carvin Garage · Carvin