CARVIN
Very easy3 - 4 min8 steps·Original on iFixit ↗

Sphero Mini Battery Replacement

Tools (1)

  • Small Phillips Head Screwdriver buy ↗

Parts (1)

Step-by-step instructions

Step 1 · photo 1Step 1 · photo 2
1

Remove the shell

  • Before you start, you should discharge your Sphero Mini’s battery below 25%. Usually, you can discharge the battery by playing with Sphero for around 45 mins on a full charge. Damaged batteries can start fires.
  • It’s probably a good idea to “Turn Off” your Sphero as well. You can do this from the Play or Edu app.
  • Remove the outer shell by squeezing it until it pops off.
Step 2 · photo 1
2

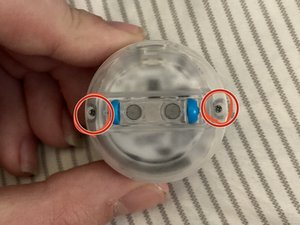
Open the casing

  • Next, you’ll need to open the casing. Unscrew the 2 phillips screws on either side of the idler wheels.
  • Remember to keep track of your screws!
Step 3 · photo 1Step 3 · photo 2
3

Remove the main board

  • The main board is also held in with two screws - go ahead and remove them.
  • You may need to slide the Bluetooth antenna’s sheath out of the way of one of the screws.
  • Again, keep track of your screws! These are a different length than the case screws.
  • Once the screws are out, pull the board directly up.
  • Everything is connected through some pin headers, so don’t worry about disconnecting any ribbon cables.
  • If one of the cables tries to come up with the mainboard, just pull it off and return it to its place.
Step 4 · photo 1Step 4 · photo 2
4

Remove the battery

  • There should be a small plastic sheet adhered to the top of the battery. Gently peel it off - we’re going to use it to lift the battery.
  • This might not be the best way to do it, but it seems to be the easiest for anyone not familiar with this type of stuff.
  • Use the plastic sheet to carefully pull upwards at the edge of the yellow tape on the battery. This should help release the small amount of adhesive.
  • Once the adhesive releases, gently pull the battery out of the way.
  • Then, you’ll need to get its connector out of the way. If it’s giving you trouble, try wiggling it a little to coax it out.
Step 5 · photo 1Step 5 · photo 2
5

Insert the new battery

  • If your battery has adhesive, peel off the protective layer.
  • Place the new battery into the slot.
  • Push the connector into the slot where the previous one was.
  • Make sure the polarities are in the same orientation as your old battery.
  • Stick that plastic sheet on top of the new battery.
Step 6 · photo 1Step 6 · photo 2
6

Reinstall the main board

  • Align the pins on the bottom of the board with the connectors below.
  • Push the board down securely.
  • Replace those 2 screws we took out earlier. (They’re the shorter pair in case you forgot).
Step 7 · photo 1Step 7 · photo 2
7

Put the top case back on

  • This is mostly self-explanatory - just remember to line the hole up with the Micro USB port.
Step 8 · photo 1Step 8 · photo 2
8

Put the shell back on

  • Again, this is self-explanatory - just pop the main thingimajig between the shell and snap it shut.

Conclusion

You did it! Hope this helps you get even more fun out of your Mini.

Guide content belongs to iFixit, license CC BY-NC-SA. Open original

Замена батареи Sphero Mini — Carvin Garage · Carvin