CARVIN
Easy45 min26 steps·Original on iFixit ↗

DIY tool for easy connector removal. 2002-2011 Chevrolet AVEO burnt out headlight bulb

Step-by-step instructions

Step 1 · photo 1Step 1 · photo 2Step 1 · photo 3
1

2011 Chevrolet Aveo Left Headlight Bulb Replacement

  • 2011 Chevrolet Aveo, replacement of a burnt-out left headlight bulb. When a bulb is burnt out, both bulbs are replaced since both have the same hours of use and wear. Therefore, the right-side bulb, which is currently okay, would burn out shortly. Aside from that, both are replaced so that they provide the same light intensity.
  • My contribution to a maintenance task on this car, which is more or less easy to perform. Removing the lamp connector is somewhat complicated since the space is narrow and it takes quite a bit of effort to grip the connector with your hand and pull it out.
  • To make this task easier, I have made a homemade puller that can be useful for many vehicle models. NOTE: this is for older models; it does not work for current ones with LEDs.
Step 2 · photo 1Step 2 · photo 2Step 2 · photo 3
2
  • Rear view of the left headlight, where we can see the lamp connector and the limited space for working.
Step 3 · photo 1Step 3 · photo 2
3
  • Testing removing the connector in another position.
Step 4 · photo 1Step 4 · photo 2Step 4 · photo 3
4
  • My contribution to this maintenance task, which fortunately we do not perform often—a lamp lasts for years—but the day we have to change it, we have a hard time. Why not try to minimize this problem?
  • The extractor is made with 2 curved metal plates (Coming from a leftover scrap from the assembly of a piece of equipment), these metal plates had been in the scrap drawer in the storage room for many years waiting for a use one day).
  • 2 screws, one 6 mm (support function) and the other 4 mm (puller function), and a small plastic tube or sleeve. I already dedicated a video to this a few years ago; I have attached it here. https://www.youtube.com/watch?v=gbhvPqVZ2UQ
Step 5 · photo 1Step 5 · photo 2Step 5 · photo 3
5
  • Other views of the homemade extractor.
Step 6 · photo 1
6
  • Extractor measurements; NOTE that these values are not critical, so you can slightly vary the width and length of the metal plates. The "jaw" gap is measured for the Chevrolet Aveo, but the extractor can be used for other cars by varying the width with the 2 screws.
Step 7 · photo 1Step 7 · photo 2Step 7 · photo 3
7
  • Usage example.
Step 8 · photo 1Step 8 · photo 2Step 8 · photo 3
8
  • Pulling the connector with ease, connector removed.
Step 9 · photo 1Step 9 · photo 2
9
  • Once removed, you can disconnect the extractor's connector.
Step 10 · photo 1Step 10 · photo 2Step 10 · photo 3
10
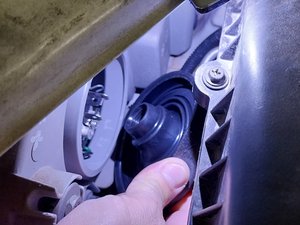
  • Now unclip the headlight rubber seal by pulling on the lower pull tab.
  • Once the rubber is removed, you can take the opportunity to wash it with water and dish soap; we will spend 3 more minutes on it and it will look like new.
Step 11 · photo 1Step 11 · photo 2Step 11 · photo 3
11
  • Squeeze the spring wire to release it, which allows you to lift it and remove the lamp.
Step 12 · photo 1Step 12 · photo 2
12
  • In halogen lamps, the damaged area is barely noticeable.
Step 13 · photo 1Step 13 · photo 2Step 13 · photo 3
13
  • Clean rubber, like new.
Step 14 · photo 1Step 14 · photo 2Step 14 · photo 3
14
  • 2 replacement halogen lamps.
  • We will replace both lamps so that they have the same hours of use and the same brightness, preventing the older one from causing a new problem in a few weeks or months.
Step 15 · photo 1Step 15 · photo 2Step 15 · photo 3
15
  • Once the lamp is positioned, press the spring wire and lock it into place.
  • Installation of the headlight rubber seal.
Step 16 · photo 1Step 16 · photo 2Step 16 · photo 3
16
  • Insert and tighten the connector.
Step 17 · photo 1
17
  • Fixed.
  • Now to replace the lamp on the right side; in this headlight, the space is smaller, which is why I decided to make the connector puller that I show in the document.
Step 18 · photo 1Step 18 · photo 2Step 18 · photo 3
18
  • We can observe that on the passenger side headlight, the space to access the bulb is even smaller.
Step 19 · photo 1Step 19 · photo 2Step 19 · photo 3
19
  • Insert the puller and test at various angles to pull on the puller in the most comfortable way possible.
Step 20 · photo 1Step 20 · photo 2Step 20 · photo 3
20
  • Connector extracted.
Step 21 · photo 1Step 21 · photo 2Step 21 · photo 3
21
  • Remove the protective rubber; we will also use this opportunity to wash it.
Step 22 · photo 1Step 22 · photo 2Step 22 · photo 3
22
  • Remove the lamp by squeezing the sides of the wire spring.
Step 23 · photo 1Step 23 · photo 2
23
  • Comparison of a blown halogen lamp and a working one. In halogen lamps, it is very difficult to distinguish at a glance whether it is damaged or not; the defect is not visible in the filament.
Step 24 · photo 1Step 24 · photo 2Step 24 · photo 3
24
  • Once the rubber seal is clean, we can reassemble it back into the headlight.
Step 25 · photo 1Step 25 · photo 2Step 25 · photo 3
25
  • Connector assembly and headlight test, completed after the lamp replacement.
Step 26 · photo 1Step 26 · photo 2
26
  • 2 Views of the extractor and its plastic tube to avoid scratching ourselves with the screw when pulling.

Conclusion

Teardown, replacement, and reassembly explained.

Guide content belongs to iFixit, license CC BY-NC-SA. Open original

DIY tool for easy connector removal. 2002-2011 Chevrolet AVEO burnt out headlight bulb — Carvin Garage · Carvin