CARVIN
Moderate50 min16 steps·Original on iFixit ↗

CHEVROLET AVEO 2002-2011 - SPARK PLUG CLEANING

Step-by-step instructions

Step 1 · photo 1Step 1 · photo 2Step 1 · photo 3
1
  • CHEVROLET AVEO LS YEAR 2011 (SPAIN), gasoline engine 1200 cc (62 CV). In other countries this values may be different.
  • Step by step guide to clean the spark plug. It is recommended to do this every 20.000 to 25.000 kilometers. If this is done due to an issue, the steps are the same.
  • ATTENTION, THE SPARK PLUG IS REMOVED WITH THE ENGINE STOPPED AND COLD, since the metal expands when the engine is hot. To disassemble the upper cover of the spark plugs we need a 6 mm Allen key, No. 6 (It is one of the most common), in this case I use a slightly longer one from an IKEA furniture assembly kit.
  • ATTENTION, I AM NOT A MECHANIC, I AM JUST A FAN, THE CAR THAT APPEARS IN THE PHOTOS IS MY PROPERTY, to which I do crazy oil changes, filters, spark plugs and small repairs, because I like to do it myself, I take it as a hobby, so I'm assuming any mechanic would do it in another more efficient way.
Step 2 · photo 1Step 2 · photo 2Step 2 · photo 3
2
  • Teardown of the four 6 mm Allen screws; lift the cover and leave it to the left, still attached to the tube, which reveals the four spark plug wires.
Step 3 · photo 1Step 3 · photo 2Step 3 · photo 3
3
  • We will start on the left side.
  • Carefully pull up on the spark plug boot; due to the length of each wire, there is no chance of confusing one wire with another in this case.
  • For the spark plug Teardown, we need a 5/8" small spark plug wrench.
Step 4 · photo 1Step 4 · photo 2Step 4 · photo 3
4
  • NOTICE: Not all cars use the same type of spark plug, and spark plugs come in various diameters. As you can see, I have 2 T-handle wrenches; of the 2 I usually use, this is the narrower one.
  • 5/8" wrench
  • Insert the wrench into the hole all the way to the bottom and, using both hands, turn counter-clockwise, to the left.
Step 5 · photo 1Step 5 · photo 2
5
  • Once unscrewed, carefully pull the spark plug upward. It will not fall out of the socket wrench because it has an internal rubber insert; you can see it in step 11.
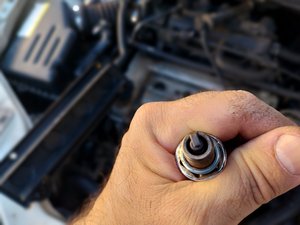
  • View of the soot-covered spark plug.
Step 6 · photo 1Step 6 · photo 2
6
  • Using a wire brush, you can quite easily clean the two electrodes of the spark plug; repeat this step for all four spark plugs.
  • View of the two electrodes once cleaned.
Step 7 · photo 1Step 7 · photo 2Step 7 · photo 3
7
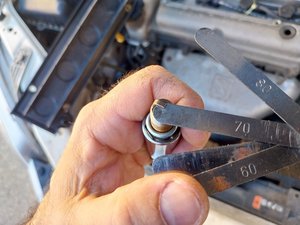
  • Before installing the spark plug into its seat on the piston, the gap between the poles must be adjusted; every car model has its own setting, although the standard is usually 0.75 mm.
  • We will use a FEELER GAUGE to adjust the gap. Since I do not have a 0.75 mm gauge, I will perform the adjustment using the 0.70 and 0.80 mm gauges.
  • The 0.70 mm gauge should pass between both poles without difficulty. The 0.80 mm gauge should not fit between the poles.
  • If the spark plug poles are too far apart, we will proceed by gently tapping the L-shaped electrode with a metal object, such as a wrench, and measure again.
  • Repeat this step as many times as necessary until you reach the 0.75 mm measurement. Once achieved, we can insert the spark plug back in—BE CAREFUL TO KEEP IT STRAIGHT AND START THREADING IT GENTLY SO AS NOT TO CROSS-THREAD IT. We must tighten it until the wrench no longer turns, but without overtightening it.
Step 8 · photo 1Step 8 · photo 2Step 8 · photo 3
8
  • Spark plug 2, we will repeat the same process as in steps 4, 5, 6, 7.
Step 9 · photo 1Step 9 · photo 2
9
  • For spark plug 3, we will repeat the same steps as in steps 4, 5, 6, and 7.
  • To proceed with removing spark plug 4, remove the cable clip by pulling on it.
Step 10 · photo 1Step 10 · photo 2
10
  • Spark plug 4, repeat the same steps as in steps 4, 5, 6, 7.
Step 11 · photo 1Step 11 · photo 2Step 11 · photo 3
11
  • As you can see, the spark plugs do not fall out of the socket. Why?
  • This is because there is a rubber ring inside the socket, which prevents the spark plug from falling by gripping it. If your socket does not have one from the factory or it has been lost, you can improvise one using a piece of sponge or a rubber tube.
Step 12 · photo 1Step 12 · photo 2
12
  • Adjusting spark plug 4.
Step 13 · photo 1Step 13 · photo 2
13
  • Once the 4 spark plugs are inserted and tightened, reattach the spark plug wires, starting with the shortest one, and "dress" the cables as you go.
Step 14 · photo 1Step 14 · photo 2Step 14 · photo 3
14
  • Once all the spark plug connectors and cables are in place, I personally (as an electrician, since I'm not a mechanic) like to pull the cable slightly to the right and secure it with a zip tie so that it isn't rubbing against the hot metal. It can withstand it, but if it doesn't touch it, it certainly won't get damaged. Just an electrician's quirk.
  • Once all the cables are neatly arranged, reposition the clamp.
Step 15 · photo 1Step 15 · photo 2
15
  • Reinstall the cover and the 4 hex screws.
Step 16 · photo 1Step 16 · photo 2
16
  • View of the engine with the cover replaced.
  • Why does my Allen wrench have white electrical tape on it? you might be asking. Well, it's simple: since the car is white, I put it there to differentiate that I only use this wrench on this car, and so that I can see it more easily when looking for it in the toolbox.
  • I hope the tutorial is helpful to you; it is very basic maintenance and relatively easy to perform for almost all upgrade kit users, which takes barely an hour. If, for you, maintenance is a hobby (as is the case for me), you will enjoy doing these little tasks on your car.

Conclusion

To reassemble your device, follow the instructions in reverse order.

Guide content belongs to iFixit, license CC BY-NC-SA. Open original

CHEVROLET AVEO 2002-2011 - SPARK PLUG CLEANING — Carvin Garage · Carvin