CARVIN
Moderate30 min18 steps·Original on iFixit ↗

SEAT ATECA - 1000 cc engine - 56CV petrol, motor air filter replacement

Step-by-step instructions

Step 1 · photo 1Step 1 · photo 2
1
  • Changing the car engine filter of the Seat Ateca Gasolina 1000 cc - 56CV. Please keep in mind that I'm the owner of the vehicle, I'm an electrician, not a mechanic. This same task performed by a professional mechanic would be done in a faster, more efficient way.
  • Picture number two is the bottom Torx screw that bolts the support.
Step 2 · photo 1Step 2 · photo 2Step 2 · photo 3
2
  • We need a TORX T27 screwdriver.
  • Place your hand under the screw when you are removing it, so it doesn't fall on the floor. Also, you can place a cloth under the screw for the same reason, it will be easy to retrieve if it falls. In this case I did not use a cloth for this step.
Step 3 · photo 1Step 3 · photo 2Step 3 · photo 3
3
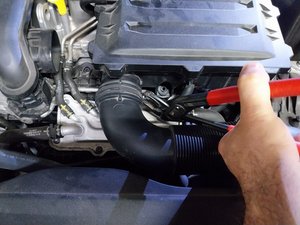
  • The best tool to remove the strap clamp is the plumbing pliers, the "Tongue & Groove,Straight Jaw". Make sure you use a large one with the teeth in good conditions, and a strong grip.
  • With universal plumbing pliers you can fasten a strap clamp, but they tend to loosen up.
  • Once the strap clamp is loose, while grabbing it, we can remove the air entry tube.
Step 4 · photo 1Step 4 · photo 2Step 4 · photo 3
4
  • We repeat the same step, to loosen the strap clamp.
  • When the strap clamp is open, we push it up slowly and remove the filter so we can unhook the tube.
Step 5 · photo 1Step 5 · photo 2
5
  • Picture 1: We unhook the tube from the left side.
  • Picture 2: We unhook the tube from the right side.
Step 6 · photo 1Step 6 · photo 2
6
  • When we lift the support, the rubber from the two central stems will unhook.
Step 7 · photo 1Step 7 · photo 2
7
  • Now that the support was removed, we can proceed to unscrew the nine screws using a TORX T20 screwdriver. (It's one of the most common screwdrivers used mostly on appliances)
Step 8 · photo 1Step 8 · photo 2Step 8 · photo 3
8
  • Image of the nine screws that need to be removed.
Step 9 · photo 1
9
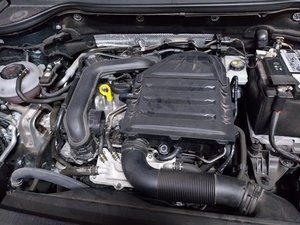
  • Image showing the motor and the two stems where all filter parts are attached.
Step 10 · photo 1Step 10 · photo 2Step 10 · photo 3
10
  • Image showing the inside of the filter after all screws were removed. As you can see, it does not have a large amount of dirt, therefore it could have remained in use.
Step 11 · photo 1Step 11 · photo 2
11
  • Example of a filter model, there are several options available.
  • I like to add the date of replacement and the amount of kilometers, to use as a reference the next time I replace it.
Step 12 · photo 1
12
  • This is the assembly of the cover and nine screws with the Torx T 20 screwdriver. Remember that we're doing this on plastic, so it's recommended you add a drop of vaseline to each screw, for a smoother entry, and avoid pressing too hard.
Step 13 · photo 1
13
  • Image showing the two stems where we need to hook the filter support. First add a small amount of vaseline or grease to them to make it easier to attach the support.
Step 14 · photo 1Step 14 · photo 2Step 14 · photo 3
14
  • Picture 2: This is the hardest step. Squeezing the top central part of the support, you use the plumbing pliers on the right side, to open the strap clamp and hook the tube. This is not an easy task, be patient.
Step 15 · photo 1Step 15 · photo 2
15
  • We attach the tube on the side, there are two small white lines that indicate where it needs to be placed.
Step 16 · photo 1Step 16 · photo 2Step 16 · photo 3
16
  • We insert the tube into the left side.
Step 17 · photo 1Step 17 · photo 2Step 17 · photo 3
17
  • We then use the plumbing pliers to open the strap clamp and attach the tube on the bottom. This is an original factory setting, it's in an uncomfortable place on the right side, so we can leave it on the left side for easier access.
Step 18 · photo 1Step 18 · photo 2
18
  • We insert the Torx screw in the lower placement part of the support, this needs to be done very carefully as it tends to fall because the hole is narrow. If you have long pliers with straight jaw, you can use them to hold the screw.
  • Also, as stated previously, you can add a cloth below the support to catch the screw if it falls. This will prevent the screw from falling in an inaccessible place. (I have not used this method this time but I will consider it in the future).
  • Task completed in approximately 30 to 40 minutes. A professional mechanic can do this faster, so if you are doing this in your own car, make sure you enjoy the task and remain calm. If you don't view it like this, as a form of entertainment, and you don't have the proper tools, it's better to visit a professional.

Conclusion

To reassemble the device, follow the steps in reverse order. ATTENTION, THIS GUIDELINE WAS DONE BY THE OWNER OF THE VEHICLE, NOT A PROFESSIONAL MECHANIC, it may contain errors.

Guide content belongs to iFixit, license CC BY-NC-SA. Open original

SEAT ATECA - двигатель 1000 куб.см - бензин 56CV, замена воздушного фильтра двигателя — Carvin Garage · Carvin