CARVIN
Moderate30 - 45 minutes18 шагов·Оригинал на iFixit ↗

2010 Chevrolet Camaro Car Battery Replacement

Use this guide to replace a dead or faulty car battery in your 2010 Chevrolet Camaro.

The car battery is an essential component in your car’s functionality. The car battery allows all your car’s technology and safety features to properly function, as well as allowing your car to startup.

Signs of a dead car battery include but are not limited: your battery starts to struggle to combat seasonal changes, your car has headlights and power but will not start, no radio, no dome light, engine will not crank, or a swollen battery sign.

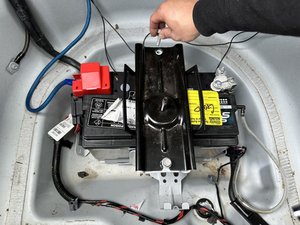
Steps 11 and 14 require you to remove the negative and positive battery terminals. Make sure to not touch these leads together when removing the battery as doing so may cause a short circuit which may result in a release of high currents as well as copious amounts of heat.

Инструменты (4)

Запчасти (1)

Пошаговая инструкция

Шаг 1 · фото 1Шаг 1 · фото 2Шаг 1 · фото 3
1
  • Open driver side door.
  • Press the trunk button on the inside of the door to unlock the trunk.
Шаг 2 · фото 1Шаг 2 · фото 2Шаг 2 · фото 3
2
  • Be careful to secure the lid once it is opened to avoid it closing on you.
  • Lift up the trunk lid.
Шаг 3 · фото 1Шаг 3 · фото 2Шаг 3 · фото 3
3
  • Remove the carpet or objects covering the spare tire cover.
Шаг 4 · фото 1Шаг 4 · фото 2Шаг 4 · фото 3
4
  • Twist the knob at the bottom of the trunk counterclockwise.
Шаг 5 · фото 1Шаг 5 · фото 2Шаг 5 · фото 3
5
  • Remove the knob.
Шаг 6 · фото 1Шаг 6 · фото 2Шаг 6 · фото 3
6
  • Lift up the spare tire cover and pull it up to remove it from the trunk.
Шаг 7 · фото 1Шаг 7 · фото 2Шаг 7 · фото 3
7
  • Use a 1/2 inch socket wrench to loosen two 13.2 mm bolts.
Шаг 8 · фото 1Шаг 8 · фото 2Шаг 8 · фото 3
8
  • Remove both 13.2 mm bolts.
Шаг 9 · фото 1Шаг 9 · фото 2Шаг 9 · фото 3
9
  • Remove the plate.
Шаг 10 · фото 1Шаг 10 · фото 2Шаг 10 · фото 3
10
  • Use an 2 mm adjustable wrench to remove the 10.1 mm nut on the negative (black) battery terminal.
Шаг 11 · фото 1Шаг 11 · фото 2Шаг 11 · фото 3
11
  • Lift up and remove the (black) negative battery terminal.
Шаг 12 · фото 1Шаг 12 · фото 2
12
  • Lightly pull on the vent tube located on the right side of the battery to remove it.
Шаг 13 · фото 1Шаг 13 · фото 2Шаг 13 · фото 3
13
  • Pinch your fingers on the red cap covering the positive terminal and open the cap.
Шаг 14 · фото 1Шаг 14 · фото 2Шаг 14 · фото 3
14
  • Use a 2 mm adjustable wrench to loosen the 10.1 mm bolt connecting to the positive (red) battery terminal.
Шаг 15 · фото 1Шаг 15 · фото 2Шаг 15 · фото 3
15
  • Do not touch the positive and negative leads together. Doing so will create a short circuit resulting in the release of high currents and heat.
  • Lift up and disconnect the positive battery terminal.
Шаг 16 · фото 1Шаг 16 · фото 2Шаг 16 · фото 3
16
  • Remove the 13.2 mm bolt that is located on the left side of the battery.
Шаг 17 · фото 1Шаг 17 · фото 2Шаг 17 · фото 3
17
  • Lift up and remove battery bolt.
Шаг 18 · фото 1Шаг 18 · фото 2Шаг 18 · фото 3
18
  • The battery is heavy so lift it with care or get help.
  • Grab onto the handles of the car battery.
  • Lift the battery out of the trunk.

Завершение

To reassemble your device, follow these instructions in reverse order.

Контент гайда принадлежит iFixit, лицензия CC BY-NC-SA. Открыть оригинал