CARVIN
Moderate30 - 45 min20 steps·Original on iFixit ↗

APC Smart-UPS SRT30000XLA Battery Cells Replacement

Use this guide to test and replace the individual battery cells in your APC uninterruptible power supply model SRT30000XLA.

Tools (4)

Step-by-step instructions

Step 1 · photo 1
1

Safety precautions

  • Before you begin your repair, unplug your UPS.
Step 1 · photo 1Step 1 · photo 2
1

Remove the front bezel

  • Plastic clips secure the front bezel.
  • Pull the left edge of the front bezel away from the device to release the plastic clip.
Step 1 · photo 1Step 1 · photo 2Step 1 · photo 3
1

Remove the covers

  • Peel off any screw covers from the top of the battery assembly.
Step 2 · photo 1Step 2 · photo 2Step 2 · photo 3
2
  • Continue pulling the left edge of the front bezel away from the device until the right clip releases.
  • Remove the front bezel.
Step 2 · photo 1Step 2 · photo 2Step 2 · photo 3
2

Unfasten the top shell

  • These screws are very tight and easily strip. Apply constant downward pressure to avoid stripping them.
  • Use a Triangle 3 driver to remove the six screws securing the battery assembly's top shell:
  • Four 22.7 mm-long screws
  • Two 15 mm-long screws.
Step 3 · photo 1Step 3 · photo 2Step 3 · photo 3
3

Disconnect the battery

  • Use the cutout in the battery connector to pull it toward the right edge of the device and disconnect it.
Step 3 · photo 1Step 3 · photo 2Step 3 · photo 3
3

Unclip the top shell

  • The top shell of the battery assembly is secured with a plastic clip.
  • Depress the plastic tab above the battery connector and lift up the top shell to release the clip.
Step 4 · photo 1Step 4 · photo 2Step 4 · photo 3
4

Reposition the battery connector

  • Lift and rotate the battery connector to move it out of the way of the battery assembly.
Step 4 · photo 1Step 4 · photo 2Step 4 · photo 3
4
  • The back of the top shell is secured with tape. Be careful to not peel the tape off during this step.
  • Swing the top shell over the battery assembly and lay it down.
Step 5 · photo 1
5

Unfasten the battery assembly

  • Use a Phillips driver to remove the three 23 mm‑long screws securing the battery assembly.
Step 5 · photo 1Step 5 · photo 2Step 5 · photo 3
5

Battery information

  • If any battery cells are leaking or showing signs of corrosion, put on nitrile gloves to protect your hands.
  • The next five steps demonstrate how to remove any one battery cell. The battery cells are identical, but the connector positions vary.
  • During reassembly, refer to these photos to reconnect the batteries properly.
Step 6 · photo 1Step 6 · photo 2
6

Remove the battery assembly

  • Pull the battery assembly out of the housing until it stops at its first plastic tab.
  • You'll feel the assembly stop abruptly and hear the plastic tab "click."
Step 6 · photo 1Step 6 · photo 2Step 6 · photo 3
6

Reposition the wire

  • If a light red wire is covering the battery cell you're working on, you’ll need to move it out of the way.
  • Lift the light red wire out of its spot next to the screw post to access the connector beneath.
  • During reassembly, make sure the wire is put back in its original spot or else the top shell won't close properly.
Step 7 · photo 1Step 7 · photo 2Step 7 · photo 3
7
  • Depress the plastic tab while pulling on the battery assembly until it clears the tab.
Step 7 · photo 1Step 7 · photo 2
7

Disconnect the battery cell

  • Grip the white spade connector and pull up to disconnect it from the [link|https://guide-images.cdn.ifixit.com/igi/xM6aIN5NIlQFyqjX.full|negative terminal|new_window=true] of the battery cell.
  • Always pull on the connector itself, not the wire.
Step 8 · photo 1Step 8 · photo 2
8
  • Continue pulling the battery assembly out of the housing until it stops at its second plastic tab.
  • You'll feel the assembly stop abruptly and hear the plastic tab "click."
Step 8 · photo 1Step 8 · photo 2
8
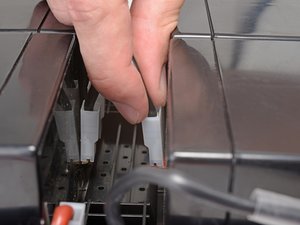
  • Repeat for the other spade connector attached to the [link|https://guide-images.cdn.ifixit.com/igi/j2fbnULsfucEE3GJ.full|positive terminal|new_window=true] of the battery cell.
Step 9 · photo 1Step 9 · photo 2Step 9 · photo 3
9
  • Depress the plastic tab while pulling on the battery assembly until it’s free from the housing.
Step 9 · photo 1Step 9 · photo 2
9

Remove the battery cell

  • Lift the battery cell out of its housing and remove it.
Step 10 · photo 1Step 10 · photo 2
10
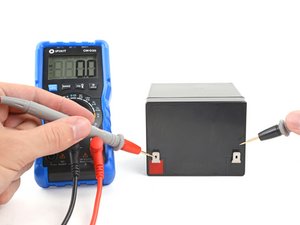
  • If you own a multimeter, you can determine the battery cell's health by measuring its voltage.
  • [guide|25632|Follow this guide|stepid=65002|new_window=true] to use a multimeter and measure voltage using these parameters:
  • If your battery cell's voltage is less than 10 V, replace it.
  • Charge the entire battery assembly to 100% and test the cell again. If your battery is less than 12 V, replace it.

Conclusion

Take your e-waste to an R2 or e-Stewards certified recycler.

To reassemble your device, follow these instructions in reverse order.

Repair didn’t go as planned? Try some basic troubleshooting, or ask our APC Smart-UPS SRT30000XLA Community for help.

Guide content belongs to iFixit, license CC BY-NC-SA. Open original

Замена аккумуляторных элементов APC Smart-UPS SRT30000XLA — Carvin Garage · Carvin