CARVIN
Easy30 min12 steps·Original on iFixit ↗

2012 Nissan Sentra Rear Taillight Replacement

For many of us who have purchased a Nissan Sentra to save gas or money on a car, there are also times when our vehicles need replacements or upgrades due to accidents or normal wear and tear. However, it might cost more to get someone else to do it, so it's better to do it ourselves while keeping the roads safe. This guide helps you replace a broken or damaged 2012 Nissan Sentra rear taillight, specifically the driver's side rear taillight. It requires the use of at least 1 tool and is easy to do; however you will need to order a new taillight online or in-store that corresponds to the 2012 Nissan Sentra. Be aware of small parts that can be dangerous to children, and be cautious of the electrical wires involves that might be damaged depending on your situation.

Before beginning, place your car in park, power off the ignition, and engage the parking brake.

Tools (1)

Step-by-step instructions

Step 1 · photo 1Step 1 · photo 2Step 1 · photo 3
1
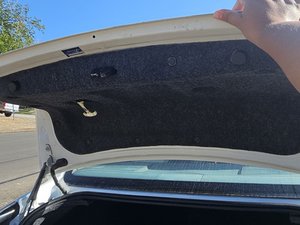
  • Open the trunk.
  • Locate the plastic large bolt behind the taillight.
  • This bolt holds the grey cover in place.
  • Remove the bolt with a flat head screw driver or wrench.
Step 2 · photo 1Step 2 · photo 2Step 2 · photo 3
2
  • Peel back the grey cover to expose the back casing of the taillight.
Step 3 · photo 1Step 3 · photo 2Step 3 · photo 3
3
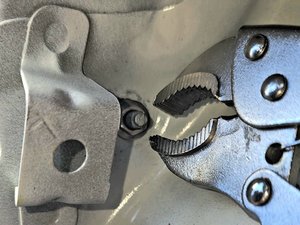
  • Use a small wrench to loosen the two nuts securing the bolts.
  • Locate the group of wires in the center that connect to the bulbs.
Step 4 · photo 1Step 4 · photo 2Step 4 · photo 3
4
  • Once the nuts are loose enough, use your fingers to remove the bolts easily.
Step 5 · photo 1Step 5 · photo 2Step 5 · photo 3
5
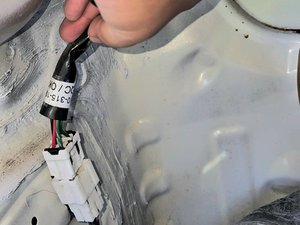
  • Disconnect the plug by pressing a button located on the back.
  • This plug will disconnect the taillight from the car.
Step 6 · photo 1Step 6 · photo 2Step 6 · photo 3
6
  • Loosen the sides of the taillight by gently pulling from side to side.
  • Pull the taillight straight out toward yourself in order to easily remove the wires from the small opening.
  • Grab the cord and pull the cord out through the small opening.
  • Place the damaged taillight aside.
Step 7 · photo 1Step 7 · photo 2Step 7 · photo 3
7
  • Wipe down the vacant area and insert the new cord, from the new taillight, through the small opening.
Step 8 · photo 1Step 8 · photo 2Step 8 · photo 3
8
  • Use your other hand to pull the wire inward and lock in the rubber grommet.
  • Make desired adjustments to the front of the taillight in order to have the best placement.
Step 9 · photo 1Step 9 · photo 2Step 9 · photo 3
9
  • Grab the cord and connect it to the outlet.
  • This will allow the light bulbs in the new taillight to work.
Step 10 · photo 1Step 10 · photo 2
10
  • Turn on your vehicle.
  • Put the car in reverse or step on the break to test out the new taillight.
  • If the rear lights turn on it means that the connection is intact.
  • Make sure to test both lights.
Step 11 · photo 1Step 11 · photo 2Step 11 · photo 3
11
  • Place the small metal nuts back onto the screws and tighten them with a wrench.
  • Make sure the rubber grommet is intact so that the wires do not backflow into the taillight.
Step 12 · photo 1Step 12 · photo 2Step 12 · photo 3
12
  • Pull the grey cover over the exposed metal and adjust it to its original place.
  • Place and push in the black plastic bolt in order to keep the grey cover from falling off.

Conclusion

This guide includes the reassembling steps so no need to backtrack!

Guide content belongs to iFixit, license CC BY-NC-SA. Open original

Замена заднего заднего фонаря Nissan Sentra 2012 года. — Carvin Garage · Carvin