CARVIN
Moderate15 - 30 min11 steps·Original on iFixit ↗

1999 - 2003 Acura TL Ignition Coil Replacement

This is a step-by-step guide will show you how to replace the ignition coil of your 1999 - 2003 Acura TL. Though this is a guide to replace a single coil, it is highly recommended that all of the ignition coils are replaced once or the engine may start to misfire. By following this guide you can save yourself an expensive trip to the mechanic.

Before you begin, turn off the car and put it in park. If you have driven recently, wait for the engine to cool before starting the repair.

Tools (2)

Parts (1)

Step-by-step instructions

Step 1 · photo 1Step 1 · photo 2
1
  • Open the driver side door of car.
Step 2 · photo 1Step 2 · photo 2
2
  • Pull the hood latch below the steering wheel and near the door frame towards you to pop open the hood.
Step 3 · photo 1Step 3 · photo 2
3
  • Lift the hood slightly to where your fingers can fit under the hood.
  • Reach your fingers under the hood to find the latch that is slightly right off the center.
  • Pull and hold the latch up while simultaneously lifting the hood all the way up until it stays stationary.
  • Be careful that the hood is lifted properly to avoid an accident.
Step 4 · photo 1Step 4 · photo 2Step 4 · photo 3
4
  • Use a flathead screwdriver to remove one screw from each corner of the cover.
Step 5 · photo 1
5
  • Pull the engine cover towards you to remove it.
Step 6 · photo 1Step 6 · photo 2Step 6 · photo 3
6
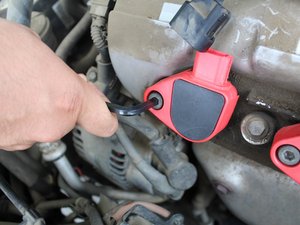
  • Pinch the socket, attached to engine coil, and pull up to release.
  • With an Allen key, loosen the screw holding the coil by turning counterclockwise.
  • Make sure to avoid exposed wires.
Step 7 · photo 1Step 7 · photo 2Step 7 · photo 3
7
  • Pull out the old coil.
  • Avoid exposed wires.
Step 8 · photo 1Step 8 · photo 2Step 8 · photo 3
8
  • Insert the new coil.
Step 9 · photo 1Step 9 · photo 2
9
  • Attach the wire socket to the new coil until you hear a "click," indicating that it is properly inserted.
Step 10 · photo 1
10
  • With an Allen key, tighten the screw into the new coil turning clockwise to secure into place.
Step 11 · photo 1Step 11 · photo 2Step 11 · photo 3
11
  • Reattach the engine cover and secure the screws with the flathead screwdriver.

Conclusion

To reassemble your device, follow these instructions in reverse order.

Guide content belongs to iFixit, license CC BY-NC-SA. Open original