CARVIN
Easy30 min - 1 h7 steps·Original on iFixit ↗

2015-2023 Ford Mustang Taillight Assembly Replacement

If the brake light or turn signal of your 2015-2023 sixth-generation Ford Mustang (S550) isn't working, follow this guide to replace the taillight assembly. While working on your car may seem daunting, this guide will highlight every step in replacing the taillight assembly of your 2015-2023 Ford Mustang.

Tips and Warnings

To prevent damaging your car, remember these warnings while replacing your taillight assembly:

  • Do not cross-thread the 10 mm hex nuts and plastic knobs.
  • Do not over-torque the 10 mm hex nuts and plastic knobs.

Tools (4)

Parts (1)

  • 2015-2023 Ford Mustang Taillight Assembly buy ↗

Step-by-step instructions

Step 1 · photo 1Step 1 · photo 2Step 1 · photo 3
1
  • Locate the two knobs inside the car's trunk.
  • Unscrew both knobs using your hand.
Step 2 · photo 1Step 2 · photo 2Step 2 · photo 3
2
  • Locate the highlighted plastic rivet inside the car's trunk.
  • Place your trim removal tool under the rivet.
  • Pop the rivet out using the trim removal tool.
Step 3 · photo 1Step 3 · photo 2Step 3 · photo 3
3
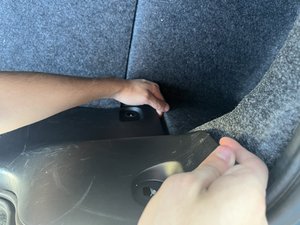
  • Grab the plastic trim and move it out over the bolts sticking out.
  • Move the carpet with your hands so that it is above the plastic trim.
  • The carpet should be held in place by the plastic trim.
Step 4 · photo 1Step 4 · photo 2Step 4 · photo 3
4
  • Locate the wiring harness
  • Unplug the wiring harness by pressing down on the securing tab and separating them.
  • The harness should separate easily, do not force it or else damage may occur.
Step 5 · photo 1Step 5 · photo 2Step 5 · photo 3
5
  • Locate the three 10 mm hex nuts behind the carpet.
  • Remove the 10 mm hex nuts using a 10 mm wrench.
Step 6 · photo 1Step 6 · photo 2Step 6 · photo 3
6
  • Pull the taillight assembly out towards the direction of your body.
  • Force may be required.
  • Lift up on the rubber seal and pull out the wiring harness.
Step 7 · photo 1Step 7 · photo 2Step 7 · photo 3
7
  • Route the wiring harness of the new taillight assembly into the highlighted hole.
  • Make sure that the rubber is properly sealing to prevent moisture from entering the car.
  • Slide in the new taillight assembly.
  • Align the three threads on the back of the taillight assembly with the three holes on the bumper.

Conclusion

To secure the taillight assembly and trim, follow steps 1 through 5 in reverse order

Guide content belongs to iFixit, license CC BY-NC-SA. Open original