CARVIN
Easy20 min16 steps·Original on iFixit ↗

2011 Chevrolet Aveo Cabin Air Filter or Pollen Filter Replacement

Step-by-step instructions

Step 1 · photo 1Step 1 · photo 2Step 1 · photo 3
1
  • Replacing the cabin filter (or pollen filter) on a 2011 Chevrolet Aveo is a task I have performed several times, usually every 2 services, about 30,000 km. The manufacturer recommends every 15,000 km, but if you do not drive in excessively dusty environments, it is not necessary every 15,000 km.
  • You will find that some manufacturers include an instruction sheet for its replacement; unfortunately, not everyone does, but you can find some videos on YouTube.
  • [https://www.youtube.com/watch?v=I7HLWaBVLnU|I made this video a few years ago.]
Step 2 · photo 1Step 2 · photo 2
2
  • Filter model used, and the step-by-step manufacturer's instructions.
Step 3 · photo 1Step 3 · photo 2
3
  • 1. Empty the glove box.
  • 2. Disengage it by using a small pry tool or applying pressure to the sides.
  • 3. Once disengaged from the sides, you can pull it to unhook it from the bottom where it is snapped in.
Step 4 · photo 1Step 4 · photo 2Step 4 · photo 3
4
  • The instructions indicate to pry open the filter cover by unhooking it from the bottom and then from the sides; we will pull it downward to remove it.
  • As you can see, the space without disassembling the front bar is minimal.
Step 5 · photo 1Step 5 · photo 2Step 5 · photo 3
5
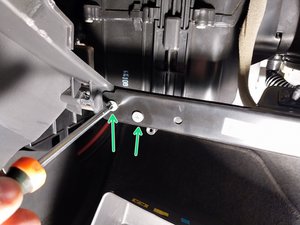
  • Unscrew the 4 screws to remove the front bar holding the glove box open switch; this will provide a slightly larger space.
Step 6 · photo 1Step 6 · photo 2Step 6 · photo 3
6
  • We haven't gained much space by removing the bar in step 5, but it makes the task a little easier; if you haven't already removed the filter cover, remove it now.
Step 7 · photo 1Step 7 · photo 2Step 7 · photo 3
7
  • We see the cover on the exterior and observe the condition of the filter; it already looks dirty from the outside.
Step 8 · photo 1Step 8 · photo 2
8
  • By pulling and turning it to the right, you can slowly extract it; the filter usually has notches or cuts that allow it to turn a little, it will not break.
  • Comparison between the removed part and its replacement.
Step 9 · photo 1Step 9 · photo 2
9
  • As we can see, the new one indicates its position, using arrows to mark the direction in which the airflow should circulate.
Step 10 · photo 1Step 10 · photo 2Step 10 · photo 3
10
  • If you are unsure about the direction of the airflow, note that the blower is on the right, so the air flows toward the left.
  • If it is still not clear, start the vehicle and turn on the cooling fan; by placing your fingers slightly into the opening, you will feel which way the air is flowing.
Step 11 · photo 1Step 11 · photo 2
11
  • For the insertion of the new filter, if you look closely, you will see it has cuts every 3 or 4 cm to allow us to fold it without damaging it.
Step 12 · photo 1Step 12 · photo 2Step 12 · photo 3
12
  • By pulling on the front plastic bar, we can bend it slightly to insert the filter into its slot more easily.
  • Once the filter is fully inserted, we can see that this model has a kind of handle in the center; not all of them have it.
Step 13 · photo 1Step 13 · photo 2Step 13 · photo 3
13
  • With the filter fully inserted, replace the cover by snapping it in first at the top, then the center, and finally at the bottom.
Step 14 · photo 1Step 14 · photo 2Step 14 · photo 3
14
  • We do not guarantee that it sits correctly.
  • We can reinsert the central metal reinforcement bar with its 4 screws.
Step 15 · photo 1Step 15 · photo 2
15
  • Replace and tighten the 4 front screws, left and right sides.
Step 16 · photo 1Step 16 · photo 2Step 16 · photo 3
16
  • We will fit the glove box, first from the bottom and then from the two side parts, and test that it opens and closes correctly.
  • END of Guide.

Conclusion

To reassemble your device, follow these instructions in reverse order.

Guide content belongs to iFixit, license CC BY-NC-SA. Open original

2011 Chevrolet Aveo Cabin Air Filter or Pollen Filter Replacement — Carvin Garage · Carvin