CARVIN
Moderate45 min12 steps·Original on iFixit ↗

2016 Honda Fit Rear Wheel Hub and Bearing Replacement

Tools (2)

Parts (1)

Step-by-step instructions

Step 1 · photo 1
1

Securing the car

  • The first thing to do is to secure the vehicle, as you will need to disengage the parking brake while removing the wheel bearing. It is VERY IMPORTANT to ensure the car cannot move.
Step 2 · photo 1
2

Manufacturer recommendation

  • The manufacturer recommends blocking the wheel opposite to the one being removed.
Step 3 · photo 1
3

Loosen the lug nuts.

  • Loosen the wheel lug nuts just enough so you can remove them once the wheel is off the ground. DO NOT remove them.
Step 4 · photo 1Step 4 · photo 2
4

Lift the vehicle

  • Lift the vehicle with a hydraulic jack; locate a rigid area of the chassis to support the jack and avoid damaging the car.
  • It is important that after removing the wheel, you place it under the vehicle as shown in the photo, as this is an extra safety measure.
Step 5 · photo 1Step 5 · photo 2
5

Remove the wheel

  • Remove the lug nuts and keep them in a safe place.
  • Remove the wheel to expose the brake drum.
Step 6 · photo 1
6

Release the parking brake

  • Release the parking brake so you can work on the wheel. Before this step, it is IMPORTANT to perform step 2. In image 1, you can see how I block the wheel.
Step 7 · photo 1Step 7 · photo 2Step 7 · photo 3
7

Remove the brake drum

  • To remove the drum, you will need a bolt that fits into either of the two holes in it. Tighten it with a wrench, and you will hear a sound indicating that it has broken loose. You can turn it a couple more times to separate it.
  • After it is separated, remove the brake drum by hand. Be careful, as it is heavy and you could injure your fingers.
Step 8 · photo 1Step 8 · photo 2Step 8 · photo 3
8

Finally, the part is in sight

  • In this step we can now see the part we are going to replace; you may already be able to see the screws securing it, but we will not remove anything yet.
Step 9 · photo 1Step 9 · photo 2Step 9 · photo 3
9

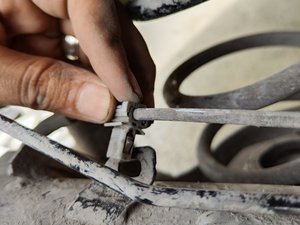
Release ABS sensor cable

  • You must release the ABS cable in three different areas; this will provide more space to work when you remove the wheel bearing.
  • It is important to mention that one of the clips has side tabs that must be pressed to allow the entire bracket to come out.
Step 10 · photo 1Step 10 · photo 2
10

Remove the hub

  • Using a ratchet and a 14 mm socket, remove the 4 bolts that secure the hub. They are not very tight; however, be careful not to hit yourself on the lug bolts.
  • Once the 4 bolts are removed, pull the hub outward. If it is very tight, you can tap the area around the lug bolts lightly while pulling outward carefully.
  • Do not pull too hard, as the ABS sensor is still connected.
Step 11 · photo 1Step 11 · photo 2
11

ABS sensor removal

  • The ABS sensor is held in place by only one screw. Be careful not to damage or pull it too hard, as you may damage it. Do not hit it either, as it appears to be made of plastic.
  • Remove it using a 10 mm socket or wrench.
Step 12 · photo 1
12

Reassemble with the new part.

  • IMPORTANT: Do not forget to tighten the ground screws, although it should not be excessive.
  • Reattach the ABS cable in its original spots, as it could get damaged with movement.
  • When installing the wheel while it is suspended, insert the lug nuts and tighten them slightly. These should be fully tightened once the car is on the ground.
  • If your car has wheel covers, locate the air valve and align it with the opening in the cover to be able to install it.

Conclusion

Follow these instructions in reverse order to reassemble your device.

Guide content belongs to iFixit, license CC BY-NC-SA. Open original

2016 Honda Fit Rear Wheel Hub and Bearing Replacement — Carvin Garage · Carvin