CARVIN
Difficult2 h20 steps·Original on iFixit ↗

2001-2007 Toyota Highlander Passenger Window Regulator Clip Replacement

In this guide you will learn how to replace the passenger side window regulator clip for a 2006 Toyota Highlander.

This clip is important to ensure proper function of the car window. It connects the window glass to the window regulator assembly that lowers and raises the window system. When it is broken, the window regulator may move but the glass will not raise or lower. When the clip is broken, the window may fall out of alignment when lowering and/or be stuck in the open/closed position.

During this guide, be careful when interacting with electrical components and make sure the car battery is disconnected when doing electrical repair.

It is recommended to have two people work on this repair.

Tools (6)

Parts (2)

Step-by-step instructions

Step 1 · photo 1Step 1 · photo 2
1
  • Pull up on the hood release handle under the steering wheel to unlock the hood.
  • Pull up on the hood release latch under the hood lip to unlatch the hood.
Step 2 · photo 1Step 2 · photo 2
2
  • Lift and hold the hood open with one hand.
  • Lift the hood prop rod up from the holder in front of the engine.
  • Insert the hoop prop rod into the hole on the underside of the hood.
  • Gently let go of the hood, ensuring the hood prop rod seats properly.
  • Caution: the hood may fall unless the hood prop rod is properly secured in the appropriate slot on the underside of the hood.
Step 3 · photo 1Step 3 · photo 2
3
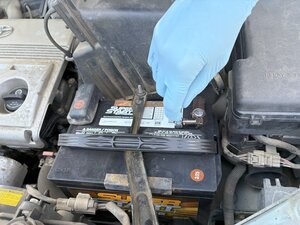
  • Use the 10mm socket wrench to loosen the 10mm bolt holding on the negative (black) lead.
  • Lift the negative (black) wire away from the battery post and set the wire aside so it will not touch the battery post.
  • Lift the plastic cover away from the positive battery post.
  • Lift the positive (red) wire away from the battery post, cover the wire with the plastic cover, and set the wire aside so it will not touch the battery post.
  • WARNING: Order of disconnection matters. Disconnect negative (black) terminal first, then positive (red) terminal.
Step 4 · photo 1Step 4 · photo 2Step 4 · photo 3
4
  • Run the plastic trim tool around the lip of the door grip, and gently pry the trimming up to reveal a screw.
  • Remove the screw with a Phillips screwdriver.
Step 5 · photo 1Step 5 · photo 2Step 5 · photo 3
5
  • Remove the door handle Philips head screw located behind the small flap on the door handle.
  • Gently pry the door handle cover off.
Step 6 · photo 1Step 6 · photo 2Step 6 · photo 3
6
  • Remove the remaining door trim pieces.
Step 7 · photo 1
7
  • Gently pull the bottom of the door panel away from the frame.
  • Guide the door handle through the hole in the panel.
  • Unhook and remove the door paneling from the door frame.
  • Be gentle: there are wires attached to the door panel. These will be removed in the next step.
Step 8 · photo 1Step 8 · photo 2Step 8 · photo 3
8
  • Disconnect door lock and window button wires (white and blue connectors).
  • There will still be wiring attached after this step. The remaining wires are disconnected in the next step.
Step 9 · photo 1Step 9 · photo 2
9
  • Disconnect the door threshold light wire connector, located on the bottom of the door.
  • All wiring connected to the paneling should be removed now.
  • Set the door paneling cover aside.
Step 10 · photo 1Step 10 · photo 2Step 10 · photo 3
10
  • Gently peel away and remove the weather protection plastic film from the door panel.
  • Remove the handle and light wires from the film.
  • Do not cut the plastic film, only cut the adhesive.
Step 11 · photo 1Step 11 · photo 2Step 11 · photo 3
11
  • Disconnect the speaker wires.
  • Use a 10mm socket wrench to unscrew the three speaker bolts.
  • Reach into the framing and push the speaker from behind to remove the speaker assembly.
Step 12 · photo 1Step 12 · photo 2
12
  • Remove the window button console from the door paneling.
  • Reconnect the wires on the door frame to the window button console.
Step 13 · photo 1Step 13 · photo 2
13
  • Use a 10 mm socket wrench to reconnect the positive terminal (red) on the car battery.
  • Use a 10 mm socket wrench to reconnect the negative terminal (black) on the car battery.
  • WARNING: Order of connections matters. Connect positive (red) terminal first, then negative (black) terminal second.
Step 14 · photo 1Step 14 · photo 2Step 14 · photo 3
14
  • Turn the car on.
  • Physically hold the window glass in place.
  • Use the window button console to slowly roll down the window framing until the regulator clips are visible and accessible in the spaces where the speaker and blue film were.
  • The window should be detached from the framing.
  • Gently rotate and lift the window glass out of the door.
  • Set the glass aside.
Step 15 · photo 1Step 15 · photo 2
15
  • Use a 10 mm socket wrench to unbolt and remove the old window regulator clips.
Step 16 · photo 1
16
  • Clean the window glass.
  • Remove the old adhesive and the old window clip if applicable.
  • Acetone can be used to help remove difficult adhesive.
Step 17 · photo 1Step 17 · photo 2Step 17 · photo 3
17
  • Place the new window regulator clips with the tab facing towards you.
  • Reattach the bolts with a 10 mm socket wrench.
Step 18 · photo 1Step 18 · photo 2
18
  • Gently lower the window glass into the door frame.
  • Place the window glass into the window regulator clips and check the alignment.
  • Hold the window glass in place. Use the driver's side window button console to lower the window framing to reaccess the window regulator clips.
Step 19 · photo 1Step 19 · photo 2Step 19 · photo 3
19
  • Assemble the adhesive applicator per manufacturer instructions.
  • Apply adhesive into the window regulator clip channel.
  • Use the window buttons console to slowly roll up the framing to meet the window glass. Insert the window glass into the window regulator clips.
  • Apply more adhesive if needed.
  • The adhesive hardens quickly, plan accordingly.
20
  • Repeat Steps 1-11 in reverse, ensuring to disconnect battery before touching wires or connectors. Let adhesive cure at least 24 hours before resuming normal use.

Guide content belongs to iFixit, license CC BY-NC-SA. Open original

Замена зажима регулятора окна пассажира Toyota Highlander 2001-2007 гг. — Carvin Garage · Carvin