CARVIN
Moderate30 - 45 min11 steps·Original on iFixit ↗

Logitech MX Keys Mini Battery Replacement

Follow this guide to replace a worn-out or dead battery in your Logitech MX Keys Mini wireless keyboard.

It’s natural for batteries to lose capacity as they age. If your keyboard dies quickly and doesn't hold a charge, it may be time to replace the battery.

For safety, perform this repair when your battery is below 15% charge. Any charged lithium-ion battery can be hazardous if punctured or damaged. If your battery looks puffy or swollen, take appropriate precautions.

Tools (6)

Parts (2)

  • Logitech MX Keys Mini Battery - Genuine buy ↗
  • Precut Double-Sided Adhesive Card(opt.) buy ↗

Step-by-step instructions

Step 1 · photo 1Step 1 · photo 2Step 1 · photo 3
1

Prepare your keyboard for disassembly

  • Slide the keyboard's power switch into the ***OFF*** position.
  • A red indicator should be visible beneath the switch.
  • Unplug all cables from your keyboard.
  • Lay your keyboard down with the feet facing up on a clean work surface.
  • If your work surface may scratch the keyboard, place a soft towel under it.
Step 2 · photo 1Step 2 · photo 2
2

Remove the feet

  • [guide|11677|Heat an iOpener|new_window=true] and lay it on the top left foot for one minute.
  • Alternatively, you can [guide|157348|use a hair dryer|new_window=true] on the ***Low*** heat setting to soften the adhesive.
  • If you're using a hair dryer, ***only heat the feet a few seconds at a time*** or you may warp the plastic.
Step 3 · photo 1Step 3 · photo 2Step 3 · photo 3
3
  • The foot should come up without much force. If it feels stuck, apply more heat and try again.
  • Insert the point of a spudger under an end of the foot.
  • Push the spudger underneath the foot and lift until you can grip it with your fingers.
  • Peel the foot up and remove it.
  • ***Repeat the process to remove the top right foot.***
Step 4 · photo 1Step 4 · photo 2
4

Reassembly information

  • To install the feet during reassembly:
  • Use a pair of angled tweezers to peel up and remove ''all'' the plastic film from the foot recesses.
  • If you're installing new feet, remove them from their backing and firmly press them into place.
  • If you're reusing the feet, use a strip of [product|IF317-072-6|double-sided tape|new_window=true] to secure them in their recesses.
Step 5 · photo 1Step 5 · photo 2Step 5 · photo 3
5

Remove the battery cover

  • Plastic film may be covering the screws in the top edge foot recesses.
  • Use the pointed end of a spudger to poke through each film so you can access the screw underneath.
Step 6 · photo 1Step 6 · photo 2
6
  • Use a Phillips screwdriver to remove the two 7.7 mm‑long screws securing the battery cover.
Step 7 · photo 1Step 7 · photo 2Step 7 · photo 3
7
  • Plastic clips secure the battery cover.
  • Insert an opening pick between the battery cover and keyboard.
  • Slide the pick along the top and bottom edges to release the clips.
Step 8 · photo 1Step 8 · photo 2
8
  • Remove the battery cover.
  • During reassembly:
  • Place the battery cover onto the keyboard assembly so the screw holes line up with their posts.
  • Press down firmly along the battery cover to engage its clips.
  • You should feel and hear distinct "clicks" as the clips engage.
Step 9 · photo 1Step 9 · photo 2Step 9 · photo 3
9

Remove the battery

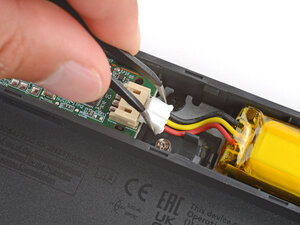
  • Use a pair of [product|IF145-020-5|angled tweezers] to ''firmly'' grip the battery connector and slide it straight out of its socket.
  • If you're having trouble, gently rock the connector side-to-side to help loosen it.
  • During reassembly:
  • Insert the connector into its socket so the side with raised plastic in the center is facing up.
  • Push on the edges of the connector with the flat end of a spudger until it's fully seated in the socket.
Step 10 · photo 1Step 10 · photo 2Step 10 · photo 3
10
  • Insert the flat end of a spudger underneath the right edge of the battery, opposite the cables.
  • Slide the spudger underneath the battery and gently lift to separate the adhesive securing it to the keyboard.
  • Make sure you push the spudger ***underneath*** the battery and not ***into*** it. ''Don't bend or deform the battery''.
  • If the battery isn't separating, apply a few drops of isopropyl alcohol (>90%) to its edge and slightly tilt the keyboard. Wait one minute for the alcohol to soften the adhesive and try again.
  • Remove the battery.
Step 11 · photo 1Step 11 · photo 2Step 11 · photo 3
11

Reassembly information

  • To install a replacement battery:
  • Remove any bits of the old adhesive from the battery recess.
  • If your replacement battery doesn't come with tape pre-installed, apply [product|IF317-072|double-sided tape|new_window=true] to the battery recess (***''not''*** directly to the battery).
  • If your replacement battery has adhesive pre-installed, remove the plastic liner.

Conclusion

Compare your new replacement part to the original part—you may need to transfer remaining components or remove adhesive backings from the new part before you install it.

To reassemble your device, follow the above steps in reverse order.

Repair didn’t go as planned? Try some basic troubleshooting, or ask our Answers community for help.

Reuse or Recycle—Never put discarded electronic parts in household waste. Visit Logitech Recycling to find your nearest recycling points, including the option to mail back old devices to Logitech for free if there’s no convenient solution in your area. You can also take your e-waste to any R2 or e-Stewards certified recycler. And don’t let good working parts or repaired devices die a slow death in your sock drawer—pass them along to someone who can use them.

Share your experience—Leave a comment here or send your feedback directly to Logitech at repair@logitech.com to help shape future repair guides and product design.

Guide content belongs to iFixit, license CC BY-NC-SA. Open original