CARVIN
Easy30 - 35 min6 steps·Original on iFixit ↗

2004 Acura TL Car Battery Replacement

Car batteries typically last around five years, and replacement is one of the most common car maintenance tasks. Despite its simplicity, many drivers feel intimidated and end up paying high service fees for a task that takes less than 30 minutes. An illustrated guide with clear steps will empower people to confidently change their own battery, saving time and money while keeping their vehicles running reliably.

When you're ready to change your car battery, it's crucial to remember the safety risks involved. Never leave the key in the car or the vehicle running while you're working on the battery. This can be hazardous and could result in electrocution. Always keep the vehicle turned off when working on the battery. Lastly, always wear your safety gloves and glasses to prevent any irritation or damage to your skin and eyes.

Tools (4)

Parts (1)

Step-by-step instructions

Step 1 · photo 1Step 1 · photo 2Step 1 · photo 3
1
  • ***As a responsible car owner, the first step is to open the hood and locate the car battery.***
  • Opening the hood is a simple task. Locate the button, which is conveniently placed on the left-hand side of the steering wheel, across from the accelerator and brake.
  • Find the battery under the hood.
  • Identify the positive (+) and negative (–) terminals. The positive (+) is on the left and the negative (-) is on the right.
  • ***Remember, safety is paramount. Never leave your key in the Key fob or the vehicle on. This precaution prevents electrocution when changing the battery.***
Step 2 · photo 1
2
  • ***For your safety, put on your gloves and safety glasses before disconnecting the battery.***
  • ***ALWAYS, perform Steps 2 through 5 with the vehicle off. This is a crucial safety measure that should never be overlooked.***
  • Disconnect the negative and positive terminals by using a socket (or wrench).
  • Remember, the required socket size is 13 mm. Using the correct tools will ensure a smooth, safe disconnection.
  • Doesn't matter which terminal you start from; loosen the nut on one terminal by turning the socket counterclockwise. Then repeat the motion with the other.
Step 3 · photo 1Step 3 · photo 2
3
  • Remove the bracket or clamp securing the battery. Then carefully lift the old battery out of the tray.
  • There are two bolts in each terminal. ***Do not remove the bolts from the bracket or clamp. It will make it difficult to reattach the battery.***
Step 4 · photo 1
4
  • Place the new battery in the tray, ensuring the terminals are aligned correctly.
Step 5 · photo 1Step 5 · photo 2
5
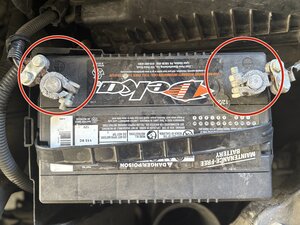
  • Reattach the clamp or bracket to secure the battery in place. Refer to photo 1, where I've circled the relevant part to ensure you're on the right track.
  • Just like in step 2, you have the freedom to choose which terminal to start with. Tighten the bolt on one terminal by turning the socket clockwise. Then, repeat the same motion with the other terminal. It's all about your comfort and convenience.
Step 6 · photo 1Step 6 · photo 2Step 6 · photo 3
6
  • After installing the battery, start the car.
  • Suppose your engine runs smoothly with no warning lights appearing. Close the hood, and your car is set to use.

Conclusion

To reassemble your device, follow these instructions in reverse order.

Be sure to take your old battery to the proper recycling facility. Don't throw away your old car battery in the garbage.

Guide content belongs to iFixit, license CC BY-NC-SA. Open original

Замена аккумулятора автомобиля Acura TL 2004 года выпуска — Carvin Garage · Carvin