- Using a 10 mm wrench, disconnect the negative terminal from the battery.
- Place a drip pan of adequate size (should be able to hold at least 1 gallon) directly under the water pump under the car.
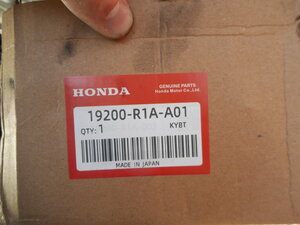
- Make sure you have acquired the correct part to replace the water pump (as shown on the label in the image).
2012-2015 Honda Civic Water Pump Replacement
Replacing the water pump on a 2015 Honda Civic is a moderate-difficulty repair that can prevent costly engine damage if done properly, since a failing pump can cause coolant leaks, overheating, or unusual noises from the engine bay.
Before you begin, know that the water pump on this model is driven by the serpentine belt, so you'll be working in tight spaces near moving components - disconnecting the battery is essential for safety. You'll also need to drain the coolant, so have a drain pan, fresh coolant, and proper disposal plans ready, as coolant is toxic.
Make sure you have the appopriate replacement pump, gaskets, and a basic set of hand tools, including a torque wrench to secure bolts correctly. This repair is also a good opportunity to inspect the serpentine belt, hoses, and surrounding equipment for wear. With patience, the right tools, and attention for hazards, you can safely complete the repair and restore the engine's cooling performance. The water pump itself is usually in need of replacement due to corrosion causing a hole to form which leaks the coolant. The Honda model number for the water pump is 19200-R1A-A01.
Step-by-step instructions
- Use a 19 mm ratchet to release the bolt tensioning the belt.
- Remove the belt.
- Unclamp the electrical connectors.
- Remove the bolts holding the alternator in with a 12 mm wrench.
- To remove this water pump pulley, use a 10 mm wrench to unscrew the bolts attached.
- This step is necessary to gain adequate clearance to remove the water pump.
- Two different size bolts will need to be removed in this step: 12 mm and 8 mm
- Disconnect the spring and bottom of the tensioner via the bolts attached. Once the spring is disconnected and the bottom of the tensioner is disconnected, the entire tensioner can be rotated clockwise around the water pump to be removed straight out and up.
- There should be a handful of 10 mm bolts sealing the body of the water pump to the engine.
- Remove the bolts and then the water pump.
- Once the site for the water pump has been dried of any excess fluid, put on the new water pump and reinstall the old bolts.
- Once the water pump has been replaced, everything else can be put back together in reverse order of steps 1-7.
- In these images, I've included a diagram to indicate where the serpentine belt needs to be located around each pulley, an example of refilling the coolant, and picture of where the coolant can be refilled.
- Make sure that the coolant drained to the drip pan is disposed of legally and ethically.
Conclusion
To reassemble your engine, follow these instructions in reverse order.
Guide content belongs to iFixit, license CC BY-NC-SA. Open original