CARVIN
Moderate30 min17 steps·Original on iFixit ↗

2005 Toyota 4Runner Rear Taillight Right Replacement

This guide demonstrates how to safely replace the rear passenger-side taillight bulb on a 2005 Toyota 4Runner. This is a pretty common issue, especially on older vehicles, since taillight bulbs can burn out over time or stop working due to moisture in the housing.

A broken or non-working taillight is something that should be fixed as soon as possible because it can be unsafe while driving and could even lead to being pulled over or ticketed. The good thing is that this repair is simple, affordable, and doesn’t require any special tools or mechanical experience. Most of the parts needed can be found at a regular auto parts store.

Before starting, the car should be parked on a flat surface and turned off to avoid any safety issues. It’s also important to be careful when removing the taillight housing so the plastic clips or wiring don’t get damaged. This guide is meant for beginners and walks through the process step by step to make the repair easy and safe.

Tools (4)

Parts (1)

  • Sylvania 7443 Long Life Auto Mini Bulb buy ↗

Step-by-step instructions

Step 1 · photo 1Step 1 · photo 2
1

Picking the Damaged Taillight

  • Locate which side your damaged taillight is on.
  • Next image is dark to demonstrate the light bulb not being active.
Step 2 · photo 1Step 2 · photo 2Step 2 · photo 3
2

Access to the electronic hardware

  • Locate this small panel on the inside of the trunk area.
  • The panel will be directly behind the taillight fixture.
  • Use a flat tool (Flat Screw Driver or Pry-tool) in the only notch on the panel to pop open the panel.
  • The tool that I am personally using is a "Clip Remover" that is used to remove clips that typically hold plastic fixings in a vehicle, simply because it is flat and easy to use.
Step 3 · photo 1Step 3 · photo 2
3

Storing the Removed Panel

  • This is what the panel looks like when properly removed, ensure there is no broken areas.
  • *CAUTION* Keep the panel dry due to the insulation on the inside to protect the electrical properties in the taillight housing.
Step 4 · photo 1Step 4 · photo 2
4

Locate the Taillight Fasteners

  • You should see two fasteners holding the housing: They are usually either 10 mm bolts or Phillips head screws.
  • One is near the top of the taillight, the other near the bottom.
  • *NOTE* The Top Bolt is very difficult to reach, get a proper view of. I found it easiest to stick my hand up into the compartment and feel around without any gloves on in order to get an accurate location and un-tighten the bolt properly.
Step 5 · photo 1Step 5 · photo 2Step 5 · photo 3
5

Remove the Taillight Fasteners

  • Loosen and remove the bottom bolt/screw as it is easier to access first.
  • *NOTE* The bolts on this vehicle were hand tightened due to previous lightbulb changes so it is much easier to loosen the bolt with your fingers.
  • *REMINDER* If the bolt is too difficult to remove you may use the 10-mm socket wrench in a counter-clockwise motion to loosen. (Not demonstrated as it would jeopardize the control of the already loose bolt).
  • *IMPORTANT* TWO Phillips #2 pan-head screws, Length: 25.4 mm (1.0 in) Thread type: M5 × 0.8 These screws secure the taillight housing to the vehicle body and are removed from the inside edge of the taillight once the rear hatch is open.
  • Remove the two 25.4 mm Phillips #2 pan-head screws (M5 × 0.8) securing the taillight assembly to the vehicle body.
  • *REMINDER* Keep the screws organized to ensure proper reinstallation.
Step 6 · photo 1Step 6 · photo 2Step 6 · photo 3
6

Unclip the Wire Harness

  • Unclipping the wiring harness will allow for the complete removal of the light housing.
  • Use a flat head screwdriver or something strong but thin to push the release style button on the top of the harness.
  • Give the wire a light tug away from the harness and it will release.
Step 7 · photo 1Step 7 · photo 2Step 7 · photo 3
7

Inspect the Wire's Head

  • *CAUTION* Make Sure that the head of the wire is not damaged or clogged with degree, potentially destroying the pins that are inside the head.
  • This is just to ensure that the build is the only issue that must be fixed. If everything looks good, proceed.
Step 8 · photo 1Step 8 · photo 2Step 8 · photo 3
8

Release the Taillight Housing

  • Place one hand on the outer lens of the taillight and the other on the inner edge
  • Gently pull the taillight straight out toward you, away from the body of the vehicle.
  • *CAUTION* Do not yank, the housing is held by plastic alignment pins that pop out of rubber grommets.
  • Wiggle it slightly while pulling straight out. You can gently tap the outer edge with the palm of your hand to help it pop loose.
Step 9 · photo 1Step 9 · photo 2Step 9 · photo 3
9

Familiarize yourself with Housing Components

  • A wiring harness going into the back.
  • Disconnect the wiring harness in order to fully remove the light housing. A good tug should do it for most of these harnesses. If no, a small push tab may be present to release the harness. (Not required in this situation).
  • Inside the taillight housing you’ll typically see several bulb sockets: Commonly: Upper bulb = brake/taillight. Middle bulb = turn signal. Lower bulb = reverse light. Turn the housing so you can easily see and reach all the bulb sockets.
Step 10 · photo 1Step 10 · photo 2Step 10 · photo 3
10

Identify the Burnt Bulb

  • Look for the bulb that looks darkened, cloudy, or broken inside.
  • *REMINDER* Before disassembly, you can have someone press the brake pedal / turn signal / reverse while you look to see which function is out.
Step 11 · photo 1Step 11 · photo 2Step 11 · photo 3
11

Remove the Bulb Socket from the Housing

  • Grab the plastic socket (the part that goes into the housing).
  • Twist the socket counterclockwise (left) about a quarter turn.
  • Pull the socket straight out from the taillight housing.
  • Now the bulb will be exposed and attached to the socket.
Step 12 · photo 1Step 12 · photo 2Step 12 · photo 3
12

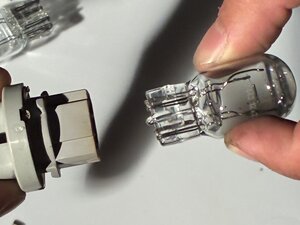
Remove the Old Bulb

  • Hold the socket firmly.
  • With your other hand, grab the bulb
  • Pull it straight out from the socket.
  • *CAUTION* Discard the old bulb safely, beware of possible broken pieces.
Step 13 · photo 1Step 13 · photo 2Step 13 · photo 3
13

Install the New Bulb

  • Line up the base and push straight in until fully seated.
Step 14 · photo 1Step 14 · photo 2Step 14 · photo 3
14

Reinstall the Socket into the Taillight Housing

  • Line up the socket tabs with the opening in the taillight housing. Insert the socket into the hole.
  • Twist the socket clockwise (right) until it locks in place. It should feel snug and not wiggle.
Step 15 · photo 1Step 15 · photo 2Step 15 · photo 3
15

Position the Taillight Housing Back on the Vehicle

  • Line up the holes where the two screws/bolts will go and the pins on the taillight around the edges.
  • Once aligned, push the housing straight back into place: Press evenly around the edges so that the housing should sit flush with the body and line up cleanly with the edge of the quarter panel.
Step 16 · photo 1Step 16 · photo 2Step 16 · photo 3
16

Reinstall the Screws/Bolts

  • Reinsert the top screw/bolt by hand first to avoid cross-threading and difficulty reaching since there is nothing else in the way.
  • Reinsert the bottom screw/bolt by hand.
  • If you would like to do so: Use your 10 mm socket or Phillips screwdriver to tighten both bolts for extra peace of mind.
  • *REMINDER* Snug them down firmly, but do not over tighten the bolts because you don’t want to crack the plastic or strip the threads. This would result in a difficult time removing the equipment later and can compromise the security of the fastened bolts.
  • *REMINDER* The measurements: Length: 25.4 mm (1.0 in) Thread type: M5 × 0.8
Step 17 · photo 1Step 17 · photo 2Step 17 · photo 3
17

Final Check

  • Step back and visually inspect:
  • The taillight should sit evenly and flush with the body. There shouldn’t be any gaps or misalignment.
  • *REMINDER* Turn the lights on one more time to confirm: Tail, brake, turn signal, and reverse lights all work as they should on that side.

Conclusion

The process is very straight forward and should take no longer than one hour for an individual that has no knowledge of vehicle repairs. Follow the steps from 1 to 18 in order to complete the entire process correctly.

Guide content belongs to iFixit, license CC BY-NC-SA. Open original