- Place the vehicle on level ground in park with the parking brake engaged. If able park with the front tires on grass or loose gravel for ease of step 20.
- Before beginning make sure the engine has had enough time to cool (over night).
2003-2015 Nissan Armada Power Steering Pump Replacement
Follow this step-by-step guide to replace the power steering pump for a 2003-2015 Nissan Armada.
You may need to replace the power steering pump if it is leaking, making unusual noises, failing to provide steering assist, or has stopped working altogether. The power steering pump helps reduce the effort required to turn the steering wheel while the engine is running. Driven by the engine belt, the pump generates hydraulic pressure that assists the steering system, making it easier to turn the front wheels. Without power steering assist, steering the vehicle requires significantly more effort.
Before beginning the repair, make sure the vehicle is turned off, parked on a level surface, and the parking brake is engaged.
Tools (18)
- 3/8" Drive Metric Deep Socket Set buy ↗
- 3/8" Drive Extension Set buy ↗
- 3/8" Drive Ratchet buy ↗
- 1/2" Drive Ratchet buy ↗
- 3/8" Torque Wrench buy ↗
- 1/2" Torque Wrench buy ↗
- 27 mm socket buy ↗
- 3/8" drive 27mm socket buy ↗
- 15/16" Socket buy ↗
- 15/16" Box Wrench buy ↗
- Right angle pick buy ↗
- 2× hose pinch plier buy ↗
- 3/16" roll pin punch buy ↗
- fluid catch pan buy ↗
- Free standing flashlight buy ↗
- body panel clip tool buy ↗
- 3/8" Ratchet (Socket Wrench) buy ↗
- Pliers buy ↗
Step-by-step instructions
- Open the hood, set up the flash light, place the drip pan under the vehicle, and locate the power steering pump.
- Have all the tools ready to begin all of the following steps.
- Verify that the replacement parts match what is currently installed in the vehicle. If it does not, you MUST STOP at this step and consult a knowledgeable tech.
- Remove the "aesthetic cover”, by removing the two 10mm bolts at the front.
- Lift the cover off and set it aside.
- Loosen the two 8mm hose clamps on the piping from the filter box to the throttle body.
- With your adjustable pliers, remove the two henry clamps and slide them back out of the way.
- Pull the two ¾”, stiff hoses off the nipples on the back of the piping.
- Remove the piping and set it aside.
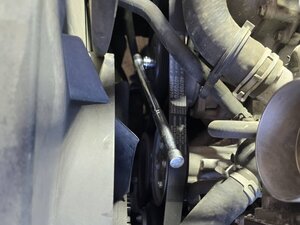
- Find the idle tensioner pulley place a 14mm socket with the longest handled ratchet (for leverage) on to the pulley bolt.
- Be sure to have the roll pin punch ready. Lift the ratchet in the counterclockwise direction (taking tension off the belt), once you have reached the max point slide the punch into the lock alignment hole. This is found at the top right of the tensioner part of the pulley assembly.
- The belt is now loose, however, pay close attention to the belt pattern (will need this info for step 19).
- Remove the belt from around the PS pump pulley.
- Use the hose clamp pliers on both of the hoses below the power steering reservoir.
- With the adjustable pliers remove and slide the henry clamps down the hose, out of the way.
- At this time you will be ready to drain, expect some “leak”, if you have a small fluid container you may use it to reduce this mess.
- Remove the hoses from under the reservoir and let it empty of fluid.
- Pull the reservoir out of the mounting plate by working it left and right with upward pressure.
- Use a body panel clip tool to gently remove the four electrical mounting clips from the reservoir mounting plate.
- Remove the two 10mm bolts from the mounting plate,
- Remove the mounting plate and set it aside.
- Unplug the power steering pressure sensor. Place the wiring pigtail out of the way (towards the cab).
- Use the 27mm deep socket to remove the power steering pressure sensor.
- This needs to be done with care because electronic components are delicate. Set aside safely.
- Remove clamp pliers from the larger hose (was from the power steering pump to reservoir) and drain it.
- Then remove the lower henry clamp by sliding it up the hose.
- Remove this hose and both henry clamps, store all parts to the side.
- Place the clamp pliers on the line/hose still attached to the power steering pump.
- With a 15/16” wrench remove the “bango bolt” noted in image on the left side of the power steering pressure sensor insert.
- Also seen in the image after being removed from the side of the power steering pump.
- Move the banjo fitting on the end of the pressure line/hose out of the way (toward the front of the vehicle).
- With an 11mm socket and a 14mm deep socket remove the two power steering pump mounting bolts.
- The 11mm bolt is located on the upper right side behind the pulley. Slide the socket between the “spokes” of the pulley to reach it.
- The 14mm bolt is a “through bolt”, meaning it goes through the entire PS pump assembly and reaches a nut on the back. This is important because you will need to keep an eye on the nut once the bolt is loose.
- There is not enough room to photograph the location of the bolt while the power steering pump is still in place. You can see the back eyelet that the bolt passes through in the image.
- Remove the power steering pump. Slide it up with a bit of tension, once it is free remove it completely.
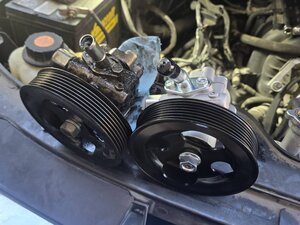
- Verify again that the replacement pump is correct for your vehicle.
- Time to reverse the process, and it is mostly that simple. Unless otherwise stated for the following steps bolts should be snugged and not fully tightened until the end.
- Prior to putting the power steering pump back into the mounting position, it is easier to install the banjo fitting and banjo bolt.
- Place the banjo bolt through the banjo fitting and begin threading it into the proper threaded fitting of the power steering pump, using the 15/16” wrench.
- Make sure that no hoses or electrical pigtails have fallen in the way.
- Put the power steering pump back into the mounting position.
- Push the 14mm “through” bolt all the way into place.
- On the backside of the pump mounting eyelet find the end of that bolt and start threading the nut back on. This is an eared nut and once started will not need to be held still.
- While the 14mm bolt is still loose begin threading the 11mm bolt in the top mounting position. Snug up both bolts.
- ***If you miss this step you may have to back track.*** Tighten the 15/16” banjo bolt the rest of the way. Remove the clamp plier from this hose.
- Thread the power steering pressure sensor into the proper position (just next to the banjo bolt).
- Before moving on while you have room. With the 27mm deep ⅜” drive socket torque the sensor to 14.5 ft-lb. This will likely require an extension.
- With the 11mm socket, tighten then torque the upper mounting bolt to 27 ft-lb.
- With the 14mm socket, tighten then torque the lower mounting bolt to 44 ft-lb
- Put the power steering reservoir mounting plate back and thread both of the 12mm bolts.
- Push the four electrical mounting clips back onto the mounting plate, ensuring that they are in the same position as before.
- Reconnect the plug to the power steering pressure sensor. Make sure to feel or hear the “snap”.
- Tighten the two 12mm bolts and torque them to 27 ft-lb.
- In the image find the unused hose nipple on the power steering pump. Install the short, large hose removed from the pump and reservoir with a henry clamp. Make sure to put another henry clamp on that hose for later.
- Find the other hose (should still have a clamp plier on it) and make sure the henry clamp is also still on that hose.
- Set the reservoir at the top of the mounting plate, but do not slide it into place.
- Slide both remaining hose ends on each of their proper nipples. If needed, use a lubricant like some of the old power steering fluid on the nipple to help slide the hose on.
- Place the henry clamps back in place on both of the hose. Take the last clamp plier off, they will no longer be needed.
- You can now push the reservoir back down into the plate and feel it lock/snug.
- Find the belt, and begin tracing the pattern mentioned earlier.
- Loop the belt over each of the pulleys, being cautious not to turn/roll the belt as well as aligning the belt grooves with the grooved pulleys.
- Center the smooth side of the belt on the smooth pulleys, however, you do not need to be perfect; these will self correct if all other pulleys are aligned.
- Once the belt is on and the pattern matches the previous state, place the 14mm socket and longest ratchet on the tensioner pulley bolt.
- ***If you miss this step you may have to back track.*** Apply pressure counterclockwise until you are able to remove the roll pin punch from the lock alignment hole.
- Release the pressure and tension will return to the belt.
- Remove all the tools from the vehicle at this time.
- With the proper power steering fluid, fill the reservoir to ¾ full. This is above the max fill line intentionally.
- Wait 5 minutes while observing and inspecting all hose connections for leaks. If any leaks are found, refer back to the relevant steps and consider replacing one of the related hoses or components if unable to resolve through reattempting the steps.
- ***DO NOT START THE ENGINE.*** Leave the cap off the reservoir for the next steps until stated otherwise.
- Enter the driver seat and turn the vehicle into accessory mode. This is battery power without the engine running, allowing the steering wheel and tires to turn without “power”.
- Turn the steering wheel all the way right and back all the way left 5 cycles. Upon completion of these cycles return the steering wheel and tires to center/ straight forward.
- Exit the driver seat, check the level of the power steering fluid in the reservoir. At this time, you will only fill to the max cold level.
- Put the cap on the reservoir and tighten. Inspect for leaks once again.
- Place the vehicle back in the OFF position to preserve the battery.
- Fit the intake piping back into the filter box and the throttle body. Make sure the hose clamps are still on the piping.
- Before you tighten the hose clamps, reinstall the two, ¾” hoses at the back of the piping.
- Move the henry clamp on each of those hoses back into place with the adjustable pliers.
- Tighten the hose clamp on the piping.
- There is no needed torque spec on these clamps, but do not tighten them to the point that the piping is flexing/being crushed.
- Reinstall the aesthetic cover. When it is set in place, push down on each side over the plastic stands until it snaps/sinks in place,
- Thread in and tighten the two 10mm bolts. Tighten these to tension, but don't cut into the plastic.
- ***The tool use process is complete and you are almost done.*** ++Inspect and VERIFY all of the tools have been removed from the vehicle. This is where you would use the above mentioned tool check list.++
- When ***all tools*** are removed and out of the way of the vehicle moving. You may begin the next step.
- With the hood open. Return to the driver seat, start the engine.
- Step out and inspect for leaks. Focus on the area where you were working, however do NOT ignore other areas. While inspecting, let the vehicle run for 5 minutes.
- Return to the driver seat. Turn the steering wheel and tires all the way right and then back all the way left 2 full cycles.
- ***A drivers license is required for this step.*** It is time to test drive, close the hood and take a short trip ½-1 mile through low speed and many turns.
- Once you return, check the power steering fluid level once more. If there is a slight change, fill it to the max hot level (now that the vehicle has been running).
- See in the photo, there are indicator lines on the reservoir. You can see our color labels, Red is hot level, blue is cold level, green is minimum cold level fill line.
Conclusion
All photos will be labeled with letters to correspond to the references in the below steps. From this point on power steering will be represented by PS. It is recommended that you use a tool check list of all the tools you have out for this project, you can also take a photo of everything organized prior to starting this project.
Guide content belongs to iFixit, license CC BY-NC-SA. Open original