CARVIN
Easy15 minutes17 шагов·Оригинал на iFixit ↗

Hyundai Accent Ignition Coils Replacement

Like most modern cars, each cylinder has its own ignition coil rather than sharing one via a distributor as in the past. All four are identical, so troubleshooting can be as simple as swapping coils and seeing if the issue follows the coil.

Инструменты (3)

Пошаговая инструкция

Шаг 1 · фото 1Шаг 1 · фото 2
1

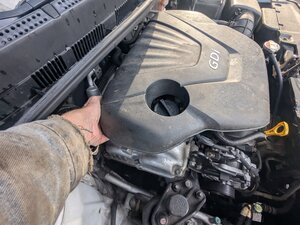
Remove the engine cover

  • Grasp the engine cover by the front edge.
  • Give it a firm yank upward.
Шаг 1 · фото 1Шаг 1 · фото 2
1
  • We're starting with the #4 cylinder here, but it doesn't actually matter where you start.
  • Slide the gray locking clip away from the coil to unlock the connector.
Шаг 2 · фото 1Шаг 2 · фото 2
2
  • Grab the rear edge of the cover.
  • Yank it upward.
Шаг 2 · фото 1Шаг 2 · фото 2
2

Unplug the coils

  • With the locking tab released, grasp the connector and pull it straight off.
Шаг 3 · фото 1
3
  • The engine cover has been removed.
Шаг 3 · фото 1Шаг 3 · фото 2Шаг 3 · фото 3
3
  • Moving along to cylinder #3, release the connector lock and unplug the coil.
Шаг 4 · фото 1Шаг 4 · фото 2Шаг 4 · фото 3
4
  • Repeat for cylinder #2.
Шаг 5 · фото 1Шаг 5 · фото 2Шаг 5 · фото 3
5
  • And, as you probably guessed, we finish up with cylinder #1.
Шаг 6 · фото 1Шаг 6 · фото 2Шаг 6 · фото 3
6

Remove the retaining fasteners

  • Using a 10 mm socket, remove the bolt securing the #4 coil.
  • For reassembly, the tightening torque is 9.8 ~ 11.8 Nm (1.0 ~ 1.2 kgf.m, 7.2 ~ 8.7 lb-ft)
  • Note that most non-professional torque wrenches are not very accurate below about 15 ft/lbs, so it is recommended to use an in/lb wrench, in which case the torque settings to use would be from 86 to 104 lb-in.
Шаг 7 · фото 1Шаг 7 · фото 2
7
  • Repeat for cylinder #3.
Шаг 8 · фото 1Шаг 8 · фото 2
8
  • Moving along to cylinder #2, rinse and repeat.
Шаг 9 · фото 1Шаг 9 · фото 2
9
  • And we finish up back on cylinder #1.
Шаг 10 · фото 1Шаг 10 · фото 2
10

Remove the coils

  • Moving back to the #4 cylinder, grasp the coil and pull straight up to remove it.
Шаг 11 · фото 1Шаг 11 · фото 2
11
  • Likewise for the #3 coil.
Шаг 12 · фото 1Шаг 12 · фото 2
12
  • We pull the #2 coil.
Шаг 13 · фото 1Шаг 13 · фото 2
13
  • And for our grand finale, we remove the coil from cylinder #1.
Шаг 14 · фото 1
14
  • The ignition coils have been removed.

Завершение

To reassemble your device, follow these instructions in reverse order.

Контент гайда принадлежит iFixit, лицензия CC BY-NC-SA. Открыть оригинал