CARVIN
Moderate20 - 45 min13 steps·Original on iFixit ↗

1998 Jeep Grand Cherokee Spark Plugs Replacement

Spark plugs ignite the air-fuel mixture inside each cylinder, allowing the engine to run efficiently. Over time, spark plugs wear out and can cause rough idling, engine misfires, poor fuel economy, reduced acceleration, and hard starting. This guide explains how to replace the spark plugs on a 1998 Jeep Grand Cherokee equipped with the 4.0L inline-six engine.

Before beginning, disconnect the negative battery terminal and allow the engine to cool completely to prevent burns from hot engine components. Replace only one spark plug at a time to avoid mixing up the spark plug wires and affecting the engine's firing order. Following this guide will help restore engine performance and improve reliability.

Tools (5)

Parts (1)

  • Spark Plugs for a 1998 Jeep Grand Cherokee buy ↗

Step-by-step instructions

Step 1 · photo 1
1
  • Use a 10 mm socket or wrench to loosen the negative battery terminal clamp.
  • Lift the cable off the battery post and move it aside so it cannot accidentally touch the terminal while you are working.
  • Disconnecting the battery helps prevent accidental electrical shorts while working around the ignition system.
  • Keep the battery cable away from the terminal until all six spark plugs have been replaced.
Step 2 · photo 1Step 2 · photo 2Step 2 · photo 3
2
  • Use a ratchet 15mm with a 6mm extension (or longer) to loosen the belt tensioner bolt.
  • Lift the belt over the AC compressor to remove it.
Step 3 · photo 1Step 3 · photo 2Step 3 · photo 3
3
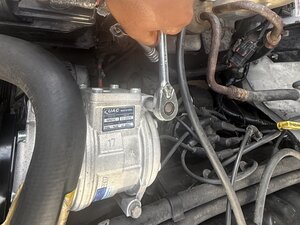
  • Unplug the AC compressor before removal.
  • Loosen the four bolts that secure the AC compressor.
  • Move the belt from over the AC compressor.
  • Place the AC compressor to the side ( In a safe place ).
Step 4 · photo 1Step 4 · photo 2
4
  • Remove the first spark plug wire.
  • Grip the spark plug wire by the rubber boot, not the wire itself. Twist the boot slightly to break the seal, then pull straight away in the direction of the spark plug, until it releases from the spark plug.
  • Remove only one spark plug wire at a time. This prevents the ignition timing from being thrown off.
  • If the boot is difficult to remove, continue twisting it gently while pulling upward.
Step 5 · photo 1
5
  • Inspect the removed spark plug. Examine the old spark plug for signs of heavy carbon buildup, oil fouling, worn electrodes, or other damage. Compare its condition to the replacement spark plug before installation.
  • Uneven wear, oil deposits, or a damaged electrode may indicate an engine problem that should be diagnosed before installing new spark plugs.
  • Check the gap on the new spark plug and adjust it only if required by the spark plug manufacturer's specifications.
Step 6 · photo 1Step 6 · photo 2
6
  • Install the new spark plug. Thread the new spark plug into the cylinder head by hand until it seats.
  • Hand-threading helps prevent cross-threading the aluminum cylinder head.
  • Once seated, tighten the spark plug to 30 ft-lbs (41 N·m) using a torque wrench.
  • Never force the spark plug into the cylinder head. If you feel resistance while hand-threading, remove the spark plug and start again.
  • Always use the torque specification recommended for your replacement spark plugs.
Step 7 · photo 1
7
  • Reinstall the spark plug wire.
  • Apply a small amount of dielectric grease inside the spark plug boot if desired.
  • Dielectric grease helps prevent moisture intrusion and makes future spark plug removal easier.
  • Push the boot straight onto the spark plug until you feel or hear it click securely into place.
  • Make sure the spark plug wire is fully seated before moving to the next cylinder.
Step 8 · photo 1Step 8 · photo 2Step 8 · photo 3
8
  • Repeat Steps 4 through 8 for each of the remaining five spark plugs.
  • Replace only one spark plug and spark plug wire at a time to maintain the correct firing order.
  • Mixing up spark plug wires can cause engine misfires, rough running, or prevent the engine from starting.
Step 9 · photo 1Step 9 · photo 2Step 9 · photo 3
9
  • Reinstall Ac compressor, by doing step 3 in reverse.
  • When reinstalling bolts, hand-tighten.
  • Once the bolts are hand-tightened, torque them to the specified torque.
  • If bolts are over-tightened, they will snap and get lodged in the AC compressor mount.
Step 10 · photo 1Step 10 · photo 2
10
  • Reinstall the engine timing belt, making sure all the grooves are aligned and the belt is positioned correctly.
Step 11 · photo 1Step 11 · photo 2Step 11 · photo 3
11
  • Tighten the belt tensioner.
  • Tighten the tensioner bolt to lock the tensioner in place.
Step 12 · photo 1Step 12 · photo 2Step 12 · photo 3
12
  • Place the negative battery cable on the negative terminal.
  • Use a 10mm deep socket to tighten the negative battery cable bolt.
Step 13 · photo 1
13
  • After reinstalling and double-checking all components, cycle the engine to verify that the timing and ignition spark are correct.

Conclusion

To reassemble your device, follow these instructions in reverse order. Take your e-waste to an R2 or e-Stewards certified recycler.

Guide content belongs to iFixit, license CC BY-NC-SA. Open original

Замена свечей зажигания Jeep Grand Cherokee 1998 года выпуска — Carvin Garage · Carvin