CARVIN
Moderate1 h26 steps·Original on iFixit ↗

2005-2007 Ford Focus Front Brake Pad Replacement

The steps in this guide are used to replace the brake pads on all Focus models in the 2005-2007 generation, except for the ST model, which has slightly different brakes. Caution should be exercised when working with brake and suspension components, and proper safety goggles should be worn at all times.

Whenever working on your car's brakes and suspension, work on one side at a time. Keep the other side completely assembled so that you can reference it at any time.

Never drive a car if the brakes on one side only are changed, because the car will "pull" to one side.

Tools (9)

Parts (1)

Step-by-step instructions

Step 1 · photo 1
1
  • Put the car in park (automatic) or neutral (manual).
  • Apply the parking brake.
  • Place chocks behind the rear wheels.
Step 1 · photo 1Step 1 · photo 2
1
  • The brake fluid reservoir is located towards the back of the engine compartment.
  • Unscrew the cap and remove it.
  • Be careful when handling brake fluid. Wash hands immediately if they come in contact with it. Do not let the fluid touch any painted parts; it will strip the paint.
Step 2 · photo 1
2
  • Use a 19 mm lug wrench to loosen each lug nut a half turn.
Step 2 · photo 1
2
  • Use a turkey baster to remove 2-3 ounces of brake fluid from the reservoir.
  • Never let the fluid level drop below the minimum mark. This will let air into your lines, which will require bleeding to remove.
  • Properly dispose of old brake fluid. Do not reuse it.
Step 3 · photo 1Step 3 · photo 2
3
  • Use a hydraulic jack on the car's frame to jack the car.
  • A small notch shows where to place the jack.
  • It is only necessary to jack the car until the wheel no longer touches the ground.
Step 3 · photo 1
3
  • Use a flat head screwdriver or brake spoon to remove the outer pad retaining clip.
  • The clip has a lot of spring energy. Hold onto it with a pair of pliers when removing it to keep it from flying off and injuring someone.
Step 4 · photo 1
4
  • Place a jack stand on the frame and remove the jack.
  • Never work on or underneath a car that is only supported by a jack. The car may fall, causing serious injury, or even death.
Step 4 · photo 1
4
  • Use a flat head screwdriver to remove the black plastic guide bolt dust caps.
Step 5 · photo 1Step 5 · photo 2
5
  • Use a lug wrench to completely remove the four lug nuts.
  • Remove the wheel.
Step 5 · photo 1
5
  • Use a 7 mm Allen wrench to remove the two caliper guide bolts.
  • On the driver's side, turn towards the rear of the car. On the passenger side, turn towards the front
Step 6 · photo 1Step 6 · photo 2
6
  • Remove the clip that holds the brake line to the strut with a pair of vise grips.
  • Pull the brake line towards you and out of the bracket.
Step 7 · photo 1Step 7 · photo 2
7
  • Pull the caliper off of the rotor.
  • Place the caliper on top of a box or bucket so the brake line doesn't stretch or kink.
Step 8 · photo 1
8
  • Pull the outer brake pad from the mounting bracket.
Step 9 · photo 1
9
  • Remove the inner brake pad from the caliper.
  • The pad is held in place by three metal clips. It may take some force and wiggling to free the pad.
Step 10 · photo 1Step 10 · photo 2
10
  • This step is only necessary if you are replacing the guide bolt bushings.
  • Use a flat head screwdriver to push the bushing through its hole in the caliper.
  • Remove the bushing from the caliper.
Step 11 · photo 1
11
  • Clean the rotor, caliper, and all other hardware with an aerosol brake cleaner.
  • Never use compressed air to clean brake components. Brakes contain asbestos, and blowing the particles into the air could cause serious respiratory problems if inhaled.
Step 12 · photo 1
12
  • Coat the steel backing plates of the new brake pads with an anti-squeal coating.
Step 13 · photo 1
13
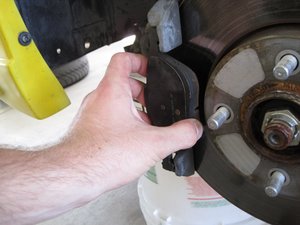
  • Place the new outer pad on the mounting bracket.
  • Small particles are a common cause of brake noise. Make sure pad and rotor surfaces are clean of all dirt and debris before installing.
Step 14 · photo 1Step 14 · photo 2
14
  • This step is only necessary if the guide bolt bushings were removed.
  • Insert the new bushing from the inside of the caliper.
  • Use a flat head screwdriver to help feed the bushing through its hole.
Step 15 · photo 1Step 15 · photo 2
15
  • Compress the caliper piston with a C-clamp.
  • Continually check the fluid level in the brake fluid reservoir to make sure it doesn't exceed the maximum level.
  • Install the new inner pad by pressing it into the caliper and making sure the clips are secure.
Step 16 · photo 1
16
  • Place the caliper back on the rotor.
Step 17 · photo 1Step 17 · photo 2
17
  • Grease the two guide bolts and reinstall them.
  • Guide bolts should be torqued to 21 foot-pounds.
  • Reinstall the guide bolt dust caps.
Step 18 · photo 1
18
  • Place the brake line back in the bracket on the strut.
  • Secure the brake line with the retaining clip. Use the blunt end of a wrench to knock it completely into place.
Step 19 · photo 1
19
  • Reinstall the retainer clip by first inserting the ends into the two holes in the caliper, then use pliers to stretch the ends onto the mounting bracket.
  • It is always a good idea to use white lithium grease wherever you have metal-on-metal contact.
Step 20 · photo 1
20
  • Put the wheels back on the car and hand tighten the lug nuts.
  • Lower the car and completely tighten the lug nuts
  • Lug nuts should torqued to 94 foot-pounds.
Step 21 · photo 1Step 21 · photo 2
21
  • Place the cap back on the brake fluid reservoir.
  • Turn the key to the "on" position. Press the brake pedal a few times. It should go to the floor once, and then become firm.
  • Fill the brake fluid reservoir with new fluid, if needed.
  • Replace the brake fluid reservoir cap, close the hood, and lower the car.

Guide content belongs to iFixit, license CC BY-NC-SA. Open original

Замена передних тормозных колодок Ford Focus 2005-2007 гг. — Carvin Garage · Carvin