CARVIN
Easy20 min8 steps·Original on iFixit ↗

1992-1999 BMW 3 Series Brake Light Bulb Replacement

Has your "Brake Light Failure" warning come up on your On Board Check computer? If so, there is a good chance the brake light bulb has failed and requires replacement.

Tools (2)

Parts (1)

Step-by-step instructions

Step 1 · photo 1Step 1 · photo 2
1
  • Determine which brake light is out. Have a friend step on the brake and see which light does not illuminate.
  • In the trunk, locate the plastic cover that protects the taillight. Turn the handle clockwise (as shown by the arrow above the handle) and gently pull outwards.
Step 2 · photo 1Step 2 · photo 2
2
  • Pinch the top and bottom of the power connection. Pull hard on the power connection to remove it, disconnecting the wiring.
Step 3 · photo 1Step 3 · photo 2
3
  • Undo all four nuts with the 8mm socket and ratchet.
  • The nuts are marked by red circles in the second image.
Step 4 · photo 1Step 4 · photo 2Step 4 · photo 3
4
  • To remove the taillight from the metal frame, push outwards (towards the back of the car) on the back of one of the plastic bulb carriers.
  • Support the taillight housing with your free hand to keep it from falling and being damaged.
Step 5 · photo 1Step 5 · photo 2Step 5 · photo 3
5
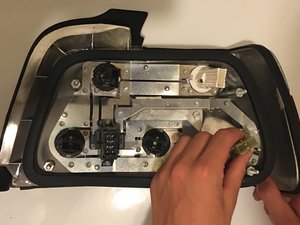
  • The brake light bulb is behind the bottom right plug. Push the plug inwards while turning it counterclockwise to remove the assembly.
  • You may need to use a lot of force to turn the plug.
Step 6 · photo 1Step 6 · photo 2
6
  • The 7528 bulb is in the off-white plastic carrier. Apply slight pressure downwards and twist counterclockwise to remove the bulb.
Step 7 · photo 1
7
  • To determine whether or not a bulb is burnt, check for a connection break in the bulb. In the image shown, wires run continuously between both connections. This means the bulb is working correctly and can be installed.
  • Insert the new bulb into the white housing and turn clockwise to install.
Step 8 · photo 1Step 8 · photo 2
8
  • The plastic carriers only fit into the taillight carrier one way. The fit is very snug against the metal ground.
  • Align the two plastic tabs with the indents in the metal sheet. Push hard inward while twisting clockwise until the bulb is horizontal, similar to the other four bulbs. When the bulb fits correctly, you will hear a loud snap.
  • The bulb carrier is very hard to place correctly. Ensure the tabs are lined up, and apply hard pressure while turning clockwise. If the bulb carrier does not sit properly, remove it and reseat it.

Conclusion

To reassemble your device, follow these instructions in reverse order.

Guide content belongs to iFixit, license CC BY-NC-SA. Open original

Замена лампы стоп-сигнала BMW 3 серии 1992-1999 гг. — Carvin Garage · Carvin