CARVIN
Easy1 hour8 шагов·Оригинал на iFixit ↗

Viking VDSC305 Oven Thermostat Replacement

Инструменты (3)

Запчасти (1)

Пошаговая инструкция

Шаг 1 · фото 1
1

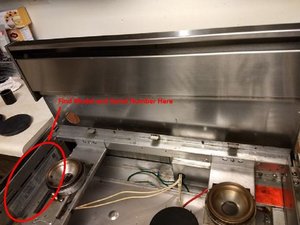
You might need a thermostat

  • The problems I had included: Oven light not turning off, wrong temperature during bake, no self-clean function, oven shuts off after pre heat. If you have some or all of these issues, your thermostat might need replacing. It is certainly worth the effort to keep this nice oven working.
Шаг 2 · фото 1
2

Find the serial number and date code

  • The model number and serial number are located on a sticker next to the left rear burner. The first 6 numbers of the serial number correspond to the month, day, year i.e. 02 31 05.
  • If your oven is before 02 02 05, the thermostat part # is PJ030003.
  • If your oven is after 02 02 05 the thermostat part # is PJ030031 which you can order from a parts dealer such as searspartsdirect.com
  • No tools needed here, just remove the burner grates to the left side and the cooking surface pulls up and toward you.
3

Order your thermostat

  • After researching online, I found a supplier that had the part for a decent price. I went with searspartsdirect but you can shop around.
  • Highly recommend ordering a NEW thermostat which you will see later. There are components that wear out which directly causes the problem in the first place.
Шаг 4 · фото 1
4

Safety First

  • Pull the oven away from the wall about a foot and unplug the electrical and shut off the gas.
  • You can see the new thermostat on the left and old one on the right for comparison.
  • The Red covered line is a vapor filled tube, do NOT cut this line or break it since the liquid inside will react with water (your hands and eyes) make sure to wear gloves and eye protection during removal and installation.
Шаг 5 · фото 1
5

Remove burners and front panel

  • First remove 4 screws (2 on left side of front panel and 2 on right side of front panel). Then you will have take 2 or more screws located by the knobs to get the panel off. This is trial and error.
Шаг 6 · фото 1
6

Remove Burner Grates and Locate Red Sensor Wire

  • Remove all of the grates and splash shields to access the top of the stove. Locate the red insulated wire that goes from the temp sensor to the back of the stove.
Шаг 7 · фото 1
7

Remove Back Panel and Locate where Sensor wire enters the Oven

  • You must remove the back panel. Approximately 12 sheet metal screws. Locate where the sensor enters the back of the oven cavity. In this picture the sensor is held by the clip near the top left (next to the yellow wire).
Шаг 8 · фото 1Шаг 8 · фото 2
8

Remove the Old Sensor Wire

  • Locate the sensor wire in the oven and remove it from the clips. Next, pull (or push) the sensor wire through the back of the oven and up through the top of the stove.

Завершение

To reassemble your device, follow these instructions in reverse order.

Контент гайда принадлежит iFixit, лицензия CC BY-NC-SA. Открыть оригинал