CARVIN
Moderate5 - 10 minutes9 шагов·Оригинал на iFixit ↗

Nexus 7 Battery Replacement

This guide will help you replace the battery.

Инструменты (2)

Запчасти (1)

Пошаговая инструкция

Шаг 1 · фото 1
1
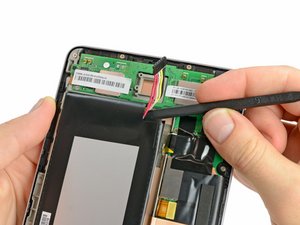
  • In the following steps you will release the clips (highlighted in red) along the perimeter of the Nexus 7's rear panel.
  • Do not use excessive force while prying the clips. They can be easily broken.
Шаг 1 · фото 1Шаг 1 · фото 2
1
  • Using the tip of a spudger, push first on one side then the other to "walk" the battery cable straight out of its socket on the motherboard.
Шаг 1 · фото 1
1
  • Wedge the flat end of a spudger inbetween the battery and the front panel assembly.
  • Run the flat end of a spudger along the top edge of the battery to separate it from the adhesive securing it to the front panel assembly.
  • Do not excessively bend the battery connector board. Be especially careful when prying up around the top left edge of the battery.
Шаг 2 · фото 1Шаг 2 · фото 2
2
  • Gently insert a plastic opening tool near the top of the Nexus 7 between the rear panel and the front panel assembly.
  • Carefully run the plastic opening tool along the top edge to pry the rear panel away from the front panel assembly of the Nexus 7.
Шаг 2 · фото 1Шаг 2 · фото 2
2
  • Wedge the flat end of a spudger between the bottom right corner of the battery and the front panel assembly.
  • Carefully run the spudger along the bottom edge of the battery while slowly lifting the battery to completely separate it from the adhesive securing it to the front panel assembly.
Шаг 3 · фото 1Шаг 3 · фото 2Шаг 3 · фото 3
3
  • Insert the plastic opening tool between the rear panel and the front panel assembly near the power button and pry up at several points along the right edge of the Nexus 7.
Шаг 3 · фото 1
3
  • Grasp the lower right corner of the battery and rotate it upwards to remove it from the front panel assembly.
  • If you encounter any resistance from the remaining adhesive, simply use the flat end of a spudger to remove the excess adhesive.
Шаг 4 · фото 1Шаг 4 · фото 2Шаг 4 · фото 3
4
  • Pry up the rear panel along the left edge using the method described in previous steps.
Шаг 5 · фото 1Шаг 5 · фото 2
5
  • Gently lift and remove the rear panel up off the front panel assembly.

Завершение

To reassemble your device, follow these instructions in reverse order.

Контент гайда принадлежит iFixit, лицензия CC BY-NC-SA. Открыть оригинал